The Timeline Docker window and the movie control panel
The Timeline Docker window lets you animate objects in a movie by adding
keyframes. Keyframes let you define changes to objects at a specific time in
their existence.
The movie control panel  lets you preview movies as you create them.
You'll insert a keyframe in the middle of
the text's timeline and make the text completely transparent at the keyframe. This will make the text gradually fade out during the first part of the animation, and then fade in during the second part. To
preview the animation, you'll play the movie.
Make your name fade in and out
- In the Timeline Docker window, click frame 10.
- Click the text's name to select it.
- Click the Insert keyframe button
 .
.
A square displays in the text's timeline in frame 10, and the start
and end points also change into squares. A square indicates a keyframe.
- Open the Interactive tools flyout
 ,
and click the Interactive transparency tool
,
and click the Interactive transparency tool  .
.
- From the Transparency type list box on the property bar, choose Uniform.
- To make the text completely transparent at frame 10, move the Starting
transparency slider
 to 100.
Preview the animation
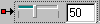
- Click the Play button
 on the control panel to preview the animation.
- Click the Stop button
 .
.
 Continue
