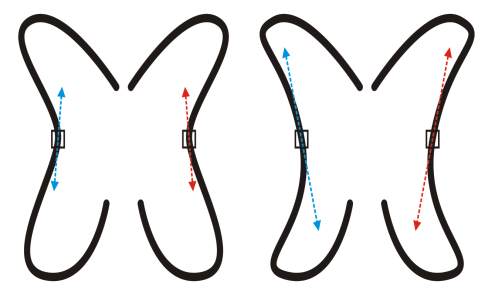
When you mirror changes in curve objects by using Reflect Nodes mode, you edit nodes and have the same edits take place in reverse on corresponding nodes. For example, you can move a node to the right, and its corresponding node moves the same distance to the left. This feature is useful when you want to shape a curve object and mirror the changes across the object’s left and right side or top and bottom side.
To mirror changes, you must select two curve objects one of which was created by mirroring the other, or a symmetrical object. For information about mirroring objects, see Rotate and mirror objects. Next, you need to choose whether to mirror changes horizontally (along a vertical line of symmetry) or vertically (along a horizontal line of symmetry). Finally, you need to select the appropriate corresponding nodes so that editing changes are mirrored across the selected objects.
Left: Two corresponding nodes are selected in mirrored curve objects. Right: When the blue control handles are moved, the change is reflected in the corresponding control handles (in red).
| 1 . |
Using the Pick tool, select mirrored curve objects or a symmetrical curve object. |
| 4 . |
Hold down Shift, and select corresponding nodes on the left and right, or top and bottom. |

To shape multiple objects by using Reflect Nodes mode, click the first object, and drag to select nodes; or hold down Shift, and click each node on the first object. Then hold down Shift, click the second object, and drag to select nodes, or hold down Shift and click each node on the second object.

The features documented in the Help are available in the full version of CorelDRAW Graphics Suite 2019. Some features may not be available in this version of the product.
