Copy, convert, remove, and replace outlines
CorelDRAW lets you copy outline properties to other objects.
You can also convert an outline to an object, and you can remove an outline. Converting an outline to an object creates an unfilled closed object with the outline’s shape. You can apply fills and special effects to the new object. You can search for objects based on their outline width and color and replace those properties.
To copy outline properties to another object

1
Using the
Pick tool

, select the object that has the outline you want to copy.
2
With the right mouse button, drag the source object over the target object, to which you want to apply the outline.
A blue outline of the original object follows the pointer to the new object.
3
When the pointer changes to a crosshair pointer

, release the mouse button, and choose
Copy outline here from the context menu.

You can also use the Attributes eyedropper  tool to copy outline properties. For more information, see To copy fill, outline, or text properties from one object to another.
You can also sample the color of an existing object and apply the sampled color to the outline of another object. For more information, see To sample a color.
To convert an outline to an object

2
Click
Object  Convert outline to object
.
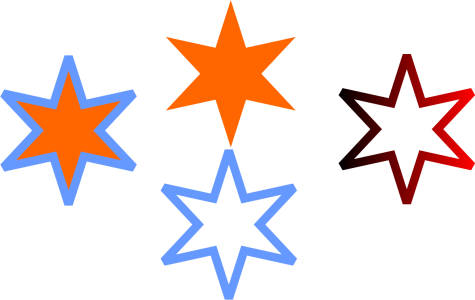
The outline becomes an unfilled closed object independent of the original object’s fill. If you want to apply a fill to the new object, the fill is applied to the area, which was the original object’s outline.
A star with an outline applied (left); the outline has been converted to an object independent of the original fill (center); a fountain fill was applied to the new closed object.

You can also convert an outline to an object by pressing Ctrl + Shift + Q.
To remove the outline of an object

2
On the property bar, choose
None from the
Outline width list box.

You can also remove an object’s outline by selecting the object and right-clicking the No color swatch  on the color palette.
To find and replace outline widths

1
Click
Edit  Find and Replace
.
2
In the
Find and Replace docker, choose
Replace Objects from the list box at the top of the docker.
3
Enable the
Outline properties option.
4
Enable the
Outline width check box in the
Find area.
5
Specify the outline width to find.
6
Enable the
Outline width check box in the
Replace area, and specify the replacement outline width.
7
Click
Find, and click any of the following:
•
Find Next > or
Find Previous < to scroll through objects that meet the outline-search criteria.
•
Find All or
Find All on Page to select all objects on the active page that meet the outline-search criteria.
•
Replace to replace the outline of the selected object.
•
Replace All to replace all outlines that meet the outline-search criteria.
|
|
|
Find and replace outline-scaling settings |
Enable the Scale outline with image check box in the Find area, and specify the setting to find. Then, enable the Scale outline with image check box in the Replace area, and specify the replacement setting. |
Find and replace outline-overprint settings |
Enable the Outline overprint check box in the Find area, and specify the setting to find. Then, enable the Outline overprint check box in the Replace area, and specify the replacement setting. |
To find and replace outline colors

1
Click
Edit  Find and Replace
.
2
In the
Find and Replace docker, choose
Replace Objects from the list box at the top of the docker.
3
Enable the
Color option.
4
In the
Find area, choose the color to find from the color picker.
5
In the
Replace area, choose the replacement color from the color picker.
6
In the
Apply to area, enable the
Outlines check box.
7
Click
Find, and click any of the following:
•
Find Next > or
Find Previous < to scroll through objects that meet the outline-search criteria.
•
Find All or
Find All on Page to select all objects on the active page that meet the outline-search criteria.
•
Replace to replace the outline color of the selected object.
•
Replace All to replace the color of all outlines that meet the outline-search criteria.
tool to copy outline properties. For more information, see To copy fill, outline, or text properties from one object to another.
on the color palette.
