Quick links to procedures on this page:
You can make objects appear three-dimensional by creating extrusions. You can create extrusions by projecting points from an object and joining them to create an illusion of three dimensions. CorelDRAW also lets you apply a vector extrusion to an object in a group.
After you create an extrusion, you can copy or clone its attributes to a selected object. Cloning and copying transfer the extrusion attributes of an extruded object to another. However, the cloned extrusion settings cannot be edited independently from the master.
You can change an extruded form by rotating it and rounding its corners.
CorelDRAW also lets you remove a vector extrusion.
Bevels
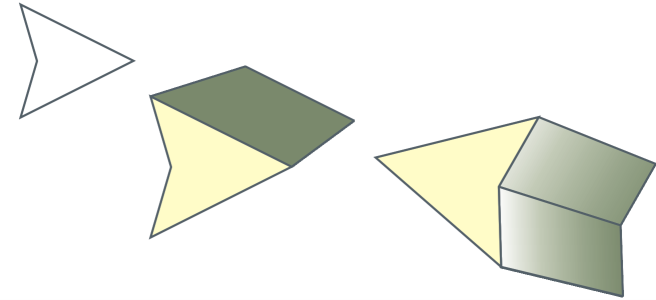
Another way in which you can give an object a three-dimensional appearance is by applying a beveled edge to an extrusion. A bevel creates the illusion that an object’s extruded edges are cut on an angle. You can specify the angle and depth values of the bevel to control the effect.
You can create a bevel effect without extruding an object. For more information, see Creating bevel effects.
Extruded fills
You can apply fills to an entire extrusion or only to the extruded surfaces. You can cover each surface individually with the fill, or you can drape the fill so that it blankets the entire object with no breaks to the pattern or texture.
Left to right: a simple shape, the shape with an extruded fill of solid color, the shape with an extruded gradient fill and a rotation applied.
Lighting
You can enhance extrusions by applying light sources. You can add up to three light sources to project toward the extruded object with varying intensity. When you no longer need light sources, you can remove them.
Vanishing points
You can create a vector extrusion in which the lines of the extrusion converge at a vanishing point. The vanishing point of a vector extrusion can be copied to another object so that both objects appear to recede toward the same point.
You can also give extrusions different vanishing points.
Extrusions with different vanishing points

You can also create an extrusion by using the Extrude docker (Effects  Extrude).
| 2 . |
Click Effects and click one of the following: |
You can also use the Attributes eyedropper tool  to copy an extrusion. For more information, see To copy effects from one object to another.
|
|
|
|
|
Select an extruded object. Click the Extrude rotation button  on the property bar. Drag the extrusion in the direction you want.
|
|
|
Using the Extrude tool  , click an extrusion. Click the vanishing point, and drag in the direction you want.
|
|
|
Using the Extrude tool , click an extrusion. Drag the slider between the interactive vector handles.
|
|
|
In the toolbox, click the Shape tool  . Drag a corner node along the outline of the rectangle or square.
|
| 2 . |
Click Effects Clear extrusion. |
You can also remove a vector extrusion by clicking the Clear extrusion button  on the property bar.
| 2 . |
Click the Extrusion color button on the property bar. |
You can apply an unbroken pattern or texture fill to an object by enabling the Drape fills check box before you click the Use object fill button.
| 3 . |
Click the Extrusion bevels button  on the property bar. on the property bar. |
You can also set the bevel depth and angle by using the Bevel interactive display box  below the Use bevel check box.
You can show only the bevel and hide the extrusion by enabling the Show bevel only check box.
| 2 . |
Click the Extrusion lighting button  on the property bar. on the property bar. |

Not all suite components documented in this Help are available in our Trial, Academic, and OEM versions. Unavailable components may include Corel applications, product features, third-party utilities, and extra content files.
Copyright 2018 Corel Corporation. All rights reserved.