Quick links to procedures on this page:
CorelDRAW lets you shape objects, including lines, artistic text, paragraph text frames, and bitmaps by applying envelopes. Envelopes are made of multiple nodes that you can move to shape the envelope and, as a result, change the shape of the object.
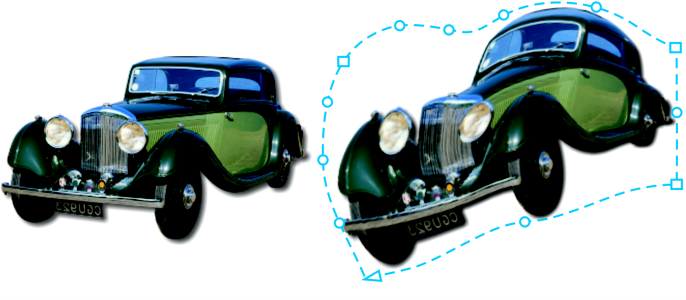
The original bitmap (left) with an envelope (right). The envelope is applied nondestructively, so you can edit it or remove it and revert to the original image at any point.
You can apply a basic envelope that conforms to the shape of an object, or you can also apply a preset envelope.
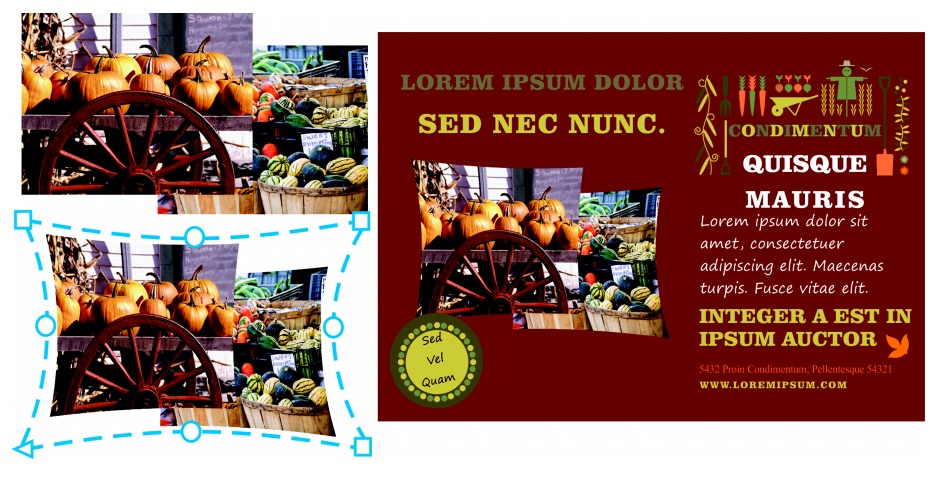
A preset envelope has been applied to a group of bitmaps.
If none of the presets fits your needs, you can create a custom envelope and save it for future use. Envelope presets are saved as Preset (.PST) files and are stored in the \AppData\Roaming\Corel\CorelDRAW Graphics Suite 2018\Draw\Presets\Envelope folder.
A custom envelope (3) is created from the shape of a vector object (1) and applied to a bitmap (2).
CorelDRAW also lets you copy and remove envelopes.
After you apply an envelope, you can edit it or add a new envelope to continue changing the object’s shape. You edit an envelope by adding and positioning its nodes. Adding nodes gives you more control over the shape of the object contained in the envelope. CorelDRAW also lets you delete nodes, move multiple nodes simultaneously, change nodes from one type to another, and change a segment of an envelope to a line or curve. For more information about the different types of nodes, see Using curve objects.
You can also change the mapping mode of an envelope to specify how the object fits to the envelope. For example, you can stretch an object to fit the basic dimensions of the envelope, and then apply the horizontal mapping mode to compress it horizontally so that it fits the shape of the envelope.
|
• |
Single-arc mode  — creates envelopes with an arc shape on one side, giving objects a concave or convex appearance — creates envelopes with an arc shape on one side, giving objects a concave or convex appearance |
|
• |
Unconstrained mode  — creates freeform envelopes that let you change the properties of the nodes, and add and delete the nodes — creates freeform envelopes that let you change the properties of the nodes, and add and delete the nodes |
|
|
|
|
|
Click the Preset list list box on the property bar, and click an envelope shape.
|
|
|
Click the Add new envelope button  on the property bar, and drag the nodes to change the shape of the envelope.
|
|
|
Click Effects  Clear envelope Clear envelope.
|

Applying an envelope to paragraph text allows you to modify only the shape of the text frame. To shape the text inside the frame, consider converting the frame to a curve after you finish editing and formatting the content. For information about converting objects to curves, see To convert objects to curve objects. Note that once you convert the frame to a curve, you can no longer edit the text. To shape individual characters with an envelope, use artistic text.
You cannot apply an envelope to a bitmap with an envelope.

You can also apply an envelope by using the Envelope docker (Effects Envelope).
You can prevent the straight lines of a vector object from being converted to curves by enabling the Keep lines button  on the property bar.
| 3 . |
Click the Create envelope from button  on the property bar. on the property bar. |
You can create an envelope only from a closed curve.
| 2 . |
Click Effects Copy effect Envelope from. |
You can also copy an envelope by selecting an object, clicking the Copy envelope properties button on the property bar, and selecting an object with the envelope you want to copy.
You can also use the Eyedropper tool  to copy an envelope. For more information, see To copy effects from one object to another.
|
|
|
|
|
Click the Unconstrained mode button on the property bar, marquee select the nodes you want to move, and drag any node to a new position.
|
|
|
On the property bar, choose Rectangular from the Selection mode list box, and drag around the nodes that you want to select.
|
|
|
On the property bar, choose Freehand from the Selection mode list box, and drag around the nodes you want to select.
|
|
|
Click the Straight line mode  , Single-arc mode or Double-arc mode  button on the property bar so that it appears raised, press Ctrl, and drag a node to a new position.
Moving corner nodes skews the envelope.
Note: This feature applies only to some preset envelopes with symmetrical nodes.
|
|
|
Click the Straight line mode , Single-arc mode or Double-arc mode button on the property bar so that it appears raised, press Shift, and drag a node to a new position.
Moving corner nodes
Moving middle nodes
Note: This feature applies only to some preset envelopes with symmetrical nodes.
|
|
|
Click the Straight line mode , Single-arc mode or Double-arc mode button on the property bar so that it appears raised, press Ctrl + Shift, and drag a node to a new position.
Moving all corner nodes stretches the envelope horizontally or vertically.
Moving all middle nodes lets you push the edges of the envelope in or pull the edges of the envelope out.
Note: This feature applies only to some preset envelopes with symmetrical nodes.
|
|
|
Click the Unconstrained mode button on the property bar so that it appears pressed, and click either the Cusp node  , the Smooth node  , or the Symmetrical node  button.
|
|
|
Click the Unconstrained mode button on the property bar so that it appears pressed, click a line segment, and click the Convert to line  button or the Convert to curve  button.
Note: Both the Convert to line and Convert to curve buttons are disabled when you apply an envelope to a bitmap.
|
If you split, crop, or erase portions of an object with an envelope, you can no longer edit the envelope.
If you edit a bitmap with an envelope in Corel PHOTO-PAINT, or if you copy a bitmap with an envelope and paste it into Corel PHOTO-PAINT or into an earlier version of CorelDRAW, the envelope is no longer editable.
|
• |
Horizontal — stretches the object to fit the basic dimensions of the envelope and then compresses the object horizontally to fit the shape of the envelope |
|
• |
Original — maps the corner handles of the object’s selection box to the envelope’s corner nodes. The other nodes are mapped linearly along the edge of the object’s selection box. |
|
• |
Putty — maps the corner handles of the object’s selection box to the envelope corner nodes |
|
• |
Vertical — stretches the object to fit the basic dimensions of the envelope and then compresses the object vertically to fit the shape of the envelope |
The mapping mode of paragraph text frames cannot be changed after an envelope is applied.

Not all suite components documented in this Help are available in our Trial, Academic, and OEM versions. Unavailable components may include Corel applications, product features, third-party utilities, and extra content files.
Copyright 2018 Corel Corporation. All rights reserved.