
| • | To enable or disable alignment guides |
| • | To modify alignment guide settings |
| • | To add margin alignment guides |
You can align objects interactively on the drawing page by using alignment guides. Alignment guides are temporary guidelines that appear when you create, resize, or move objects in relation to other nearby objects. While dynamic guides provide precise measurements for creating technical illustrations, alignment guides are useful in page layout to align text or graphic elements quickly and accurately.
Alignment guides appear as an object is moved.
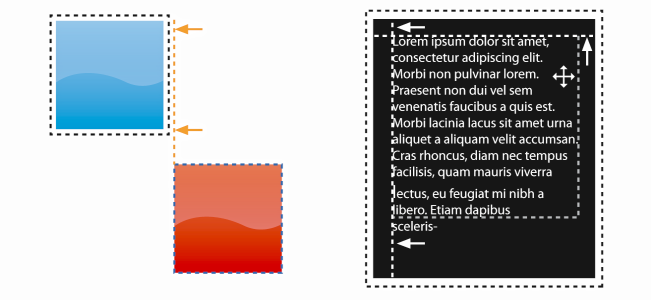
You can offset (left) and inset (right) margin alignment guides.
| To enable or disable alignment guides |
|
| • | Click View |
A check mark beside the Alignment guides command indicates that alignment guides are enabled.
You can also enable or disable alignment guides by clicking the Alignment guides button on the Layout toolbar. To open the Layout toolbar, click Window ![]() Toolbars
Toolbars ![]() Layout.
Layout.
You can also enable alignment guides by pressing Shift + Alt + A.
| To modify alignment guide settings |
|
| 1 . | Click Window |
| 2 . | In the Alignment and dynamic guides docker, click the Alignment guides button |
| 3 . | Perform any of the following tasks. |
|
Enable or disable the check box in the top-right corner of the Alignment guides section.
|
|
|
Open the Line color picker, and choose a color.
|
|
|
Open the Line style picker, and choose a line style.
|
|
|
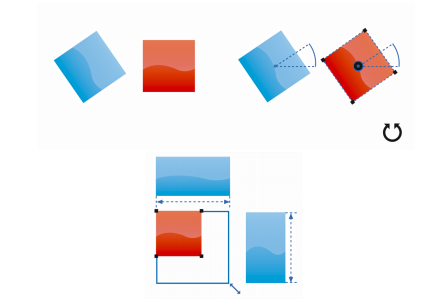
Click the Object edges button
|
|
|
Click the Object centers button
|
|
|
Click the Individual objects in a group button
|
|
|
Ensure that the Intelligent spacing button
|
|
|
Ensure that the Intelligent spacing button is enabled, and drag the object between two other objects until indicator arrows appear.
|
|
|
Ensure that the Intelligent dimensioning button
|
|
|
Ensure that the Intelligent dimensioning button is enabled, and rotate the object until rotation indicators appear.
|
You can access most alignment guide controls on the Layout toolbar by clicking the Layout toolbar button ![]() .
.
| To add margin alignment guides |
|
| 1 . | Click Window |
| 2 . | In the Alignment and dynamic guides docker, click the Alignment guides button |
| 3 . | Perform any of the following tasks. |
|
Enable the Margins check box. If the Margins check box is not displayed, click the arrow button
|
|||||||
|
Open the Margin line color picker, and choose a color.
|
|||||||
|
Open the Margin line style picker, and choose a line style.
|
|||||||
|
Type a value in the Horizontal margin box, click the Horizontal margin button, and choose one of the following options:
|
|||||||
|
Type a value in the Vertical margin box, click the Vertical margin button, and choose one of the following options:
|
|||||||
|
Click the Lock ratio button
|
|||||||
|
Disable the Object edges button
|
|||||||
|
Click the Horizontal margin button, and choose No horizontal margin
|
|||||||
|
Click the Vertical margin button, and choose No vertical margin
|
![]()
Not all suite components documented in this Help are available in our Trial, Academic, and OEM versions. Unavailable components may include Corel applications, product features, third-party utilities, and extra content files.
Copyright 2018 Corel Corporation. All rights reserved.