Quick links to procedures on this page:
You can use the Object coordinates docker to draw and modify shapes and lines with precision. The live preview in the drawing window lets you see the effects of your adjustments.
You can type coordinate values to specify the exact position, dimensions, and angle of rotation of an object. You can also set object attributes interactively by dragging in the drawing window.
Drawing rectangles and squares
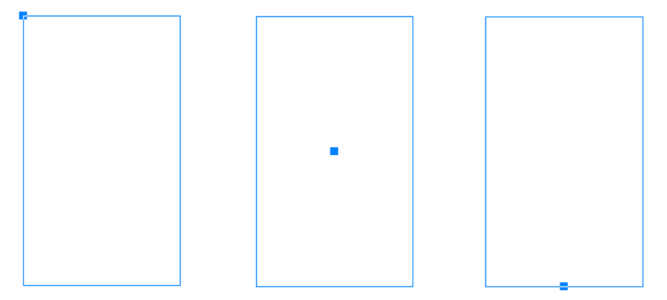
To draw a rectangle with precision, you can specify an origin point, which is one of nine points in the rectangle (four corner points, four midpoints, and one center point). If you rotate the rectangle, the origin point is used as the center of rotation. You can also specify the angle of rotation, and the width and height of a rectangle.
If the angle of rotation is 0, you can specify the position of the lower-left and upper-right corners of the rectangle.
To draw a square, you can specify the origin point, the length of a side, and an angle of rotation.
Left: The origin point of a rectangle appears as a blue node in the live preview. You can select the center point, or any corner or midpoint, as the origin point.
Drawing ellipses and circles
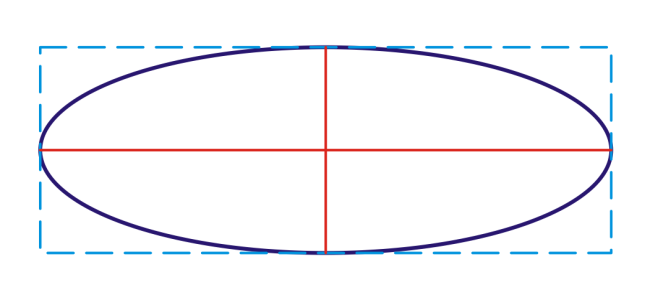
To draw an ellipse with precision, you can specify an origin point, which is one of nine points in the bounding box that can be drawn around the ellipse. The origin point is used as the center of rotation.
You can also specify the ellipse diameters, which are the width and height of the bounding box around the ellipse, and the angle of rotation. If the angle of rotation is 0, you can specify the exact position of the lower-left and upper-right corners of the bounding box around the ellipse.
To draw a circle, you can specify the origin point, diameter, and angle of rotation.
You can specify the width and height of the bounding box that can be drawn around an ellipse.
Drawing polygons
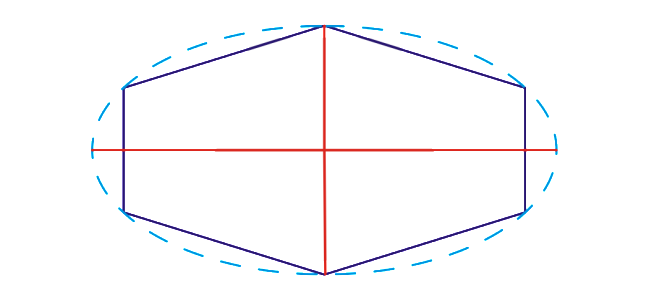
To draw a polygon, you can specify the number of sides, the angle of rotation, or the center and diameters of the bounding ellipse that can be drawn around the polygon. The center of the bounding ellipse, also known as the "polygon center," is used as the center of rotation.
You can also draw regular polygons with precision. All sides of a regular polygon are of equal length. You can specify the side length and angle of rotation, or the center and diameter of the bounding circle that can be drawn around the regular polygon.
You can specify the diameters of the bounding ellipse that can be drawn around the polygon.
Drawing lines
You can draw a straight line by using one of two methods. With the first method, you specify the start point and endpoint of the line. With the second method, you specify the start point and length of the line, plus an angle of rotation.
You can create complex lines by specifying the coordinates of multiple points. You can delete points, and you can modify the coordinates of existing points. After adding all the points you want, you can close the curved line by connecting its start point to its endpoint.
Straight and multipoint lines
Modifying existing objects
You can use the Object coordinates docker to modify existing objects with precision. Note that when you modify an existing object, it is replaced with a new object. As a result, the following transformations and effects applied to the original objects are lost: envelope effects, rotations, and skew effects. In addition, any changes that were previously applied to the nodes on a polygon are lost.
| 1 . |
Click Window  Dockers Object coordinates. Dockers Object coordinates. |
|
|
|
|
|
In the Bounding box area, type values in the x and y boxes.
|
|
|
In the Bounding box area, click the Set lower-left corner interactively button or the Set upper-right corner interactively button  , and click in the drawing window.
|
|
|
Click the Set origin point interactively button , and click in the drawing window.
|
|
|
Click either of the Set dimensions interactively buttons  , and drag in the drawing window.
|
|
|
Click the Set angle interactively button  , and drag in the drawing window.
|
| 1 . |
Click Window Dockers Object coordinates. |
|
|
|
|
|
Click the Set origin point interactively button , and click in the drawing window.
|
|
|
Click the Set dimensions interactively button , and drag in the drawing window.
|
|
|
Click the Set angle interactively button , and drag in the drawing window.
|
| 1 . |
Click Window Dockers Object coordinates. |
|
|
|
|
|
In the Bounding box area, type values in the x and y boxes.
|
|
|
In the Bounding box area, click the Set lower-left corner interactively or Set upper-right corner interactively button , and click in the drawing window.
|
|
|
Click the Set origin point interactively button , and click in the drawing window.
|
|
|
Click either of the Set diameter interactively buttons , and drag in the drawing window.
|
|
|
Click the Set angle interactively button , and drag in the drawing window.
|
| 1 . |
Click Window Dockers Object coordinates. |
|
|
|
|
|
Click the Set origin point interactively button , and click in the drawing window.
|
|
|
Click the Set diameter interactively button , and drag in the drawing window.
|
|
|
Click the Set angle interactively button , and drag in the drawing window.
|
| 1 . |
Click Window Dockers Object coordinates. |
| 3 . |
In the Object size area, type a value in the Points or sides box. |
|
|
|
|
|
Click the Set angle interactively button , and drag in the drawing window.
|
|
|
Click the Set polygon center interactively button , and click in the drawing window.
|
|
|
Click either of the Set diameter interactively buttons , and drag in the drawing window.
|
| 1 . |
Click Window Dockers Object coordinates. |
| 3 . |
In the Object size area, type a value in the Points or sides box. |
|
|
|
|
|
Click the Set dimensions interactively button , and drag in the drawing window.
|
|
|
Click the Set angle interactively button , and drag in the drawing window.
|
|
|
Click the Set polygon center interactively button , and click in the drawing window.
|
|
|
Click the Set diameter interactively button , and drag in the drawing window.
|
| 1 . |
Click Window Dockers Object coordinates. |
|
|
|
|
|
In the Points area, type values in the Start point x and y boxes. In the Object size area, type a value in the Line length box. Then, type a value in the Angle of rotation box.
|
|
|
In the Points area, click one of the Set point interactively buttons , and click in the drawing window.
|
|
|
In the Object size area, click the Set line length interactively button , and drag in the drawing window.
|
|
|
In the Object size area, click the Set angle interactively button , and drag in the drawing window.
|
| 1 . |
Click Window Dockers Object coordinates. |
| 3 . |
Click the Add point button at the bottom of the Object coordinates docker. |
|
|
|
|
|
Click a point in the Object coordinates docker. Click the Set point interactively button , and click in the drawing window.
|
|
|
Click a point in the Object coordinates docker, and click the Delete point button  .
|
|
|
Click the Auto-close/open curve button  .
|

Use the following keyboard shortcuts to create a multi-point line quickly:
|
• |
To activate the Set point interactively button, double-click a point in the docker. |

Not all suite components documented in this Help are available in our Trial, Academic, and OEM versions. Unavailable components may include Corel applications, product features, third-party utilities, and extra content files.
Copyright 2018 Corel Corporation. All rights reserved.