Fountain transparency
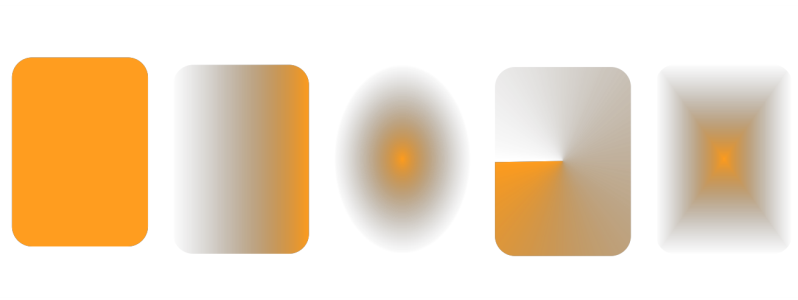
Fountain transparency makes the object fade from one transparency value to another. The fountain transparency can be linear, elliptical, conical, or rectangular.
From left to right: Original object with a linear, elliptical, conical, and rectangular transparency applied.
The application provides a collection of fountain transparencies that you can access. You can browse the available transparencies, search by keyword, mark transparencies as favorites, and sort them. You can also download additional fill packs, which can be used as transparencies. For more information, see Find and view fills and transparencies.
You can create a fountain transparency by adding and removing nodes, and specifying a transparency value for each node. You can also reverse, mirror, resize, or skew a fountain transparency, or apply other transformations.
After you create a fountain transparency, you can save it for future use or share. For more information, see Save fills and transparencies.
To apply a fountain transparency

2
Click
Object  Properties
.
3
In the
Transparency area of the
Properties docker, click the
Fountain transparency button

to display fountain transparency options.
4
Open the
Transparency picker, and double-click a thumbnail.
|
|
|
Apply the transparency only to the fill or the outline of the object |
Click the Fill button  or the Outline button  in the Transparency area of the Properties docker. |
|
|
Click the Edit transparency button  in the Properties docker, and specify the settings you want. |

You can also click the Transparency tool  in the toolbox, and use the controls on the property bar to apply a fountain transparency.
For information about how to find transparencies in the Transparency picker, see To find, filter, and sort fills and transparencies.
To create a fountain transparency

2
Click
Object  Properties
.
3
In the
Transparency area of the
Properties docker, click the
Fountain transparency button

to display fountain transparency options.
4
Click one of the following buttons to choose a fountain transparency type:
•
Linear fountain transparency 
•
Elliptical fountain transparency 
•
Conical fountain transparency 
•
Rectangular fountain transparency 
5
Click the first node below the grayscale band, and type a value in the
Opacity box.
6
Click the last node below the grayscale band, and type a value in the
Opacity box.
7
Move the midpoint slider above the grayscale band to set the midpoint of the transparency.
To save the transparency, click the click the
Save as new button

in the
Transparency area of the
Properties docker.
|
|
|
Change the transparency of the midpoint |
Select the midpoint node, and type a value in the Opacity box. |
Add an intermediate transparency |
Double-click the grayscale band where you want to add a node. With the new node selected, type a value in the Opacity box. |
Change the position of an intermediate transparency |
Drag the corresponding node to a new location below the grayscale band, or type a value in the Position box. |
Delete an intermediate transparency |
Click the Transparency tool  , and double-click the node on the interactive vector handles that appear on the object. |
Allow the transparency to be skewed or stretched disproportionately |
Enable the Free scale and skew check box. |
Mirror, repeat, or reverse the transparency |
Click the Edit transparency button  , and click one of the following buttons: • Repeat and mirror  • Repeat  • Reverse transparency  |
Specify the number of steps used to display or print the fountain transparency |
Click the Edit transparency button  , enable the Steps check box, and then type a value in the Steps box. |
Specify how quickly the fountain transparency blends from one level of opacity to another |
Click the Edit transparency button  , and move the Acceleration slider. |
Create smoother color transitions between fountain fill nodes |
Click the Edit transparency button  , and enable the Smooth transition check box. |
Set the width and height of the transparency as a percentage of the object’s width and height |
Click the Edit transparency button  , and type values in the Transparency width and Transparency height boxes. |
Move the transparency center up, down, left, or right |
Click the Edit transparency button  , and type values in the X and Y boxes. |
Slant the transparency at a specified angle |
Click the Edit transparency button  , and type a value in the Skew box. |
Rotate the transparency at a specified angle |
Click the Edit transparency button  , and type a value in the Rotate box. |

To apply the transparency only to the fill or the outline of the object, click the Fill button  or the Outline button
  .
.
You can also click the Transparency tool  in the toolbox. To adjust the transparency, use the controls on the property bar or the interactive vector handles that appear on the object.
You can also drag colors, which are converted to grayscale, from the color palette onto the transparency nodes. Alternatively, if the Transparency tool is selected, you can drag the colors onto the object’s interactive vector handles  .
.
in the toolbox, and use the controls on the property bar to apply a fountain transparency.
or the Outline button
.
in the toolbox. To adjust the transparency, use the controls on the property bar or the interactive vector handles that appear on the object.
.
