Select and move nodes
You can select individual, multiple, or all of the object’s nodes. Selecting multiple nodes lets you shape different parts of an object simultaneously. You can marquee select nodes by enclosing them with a rectangular marquee box, or by enclosing them with an irregularly shaped marquee box. Freehand marquee selection is useful when you want to select specific nodes in complex curves.
When a node is selected on curved segments, control handles are displayed. You can adjust the shape of the curved segments by moving the nodes and control handles.
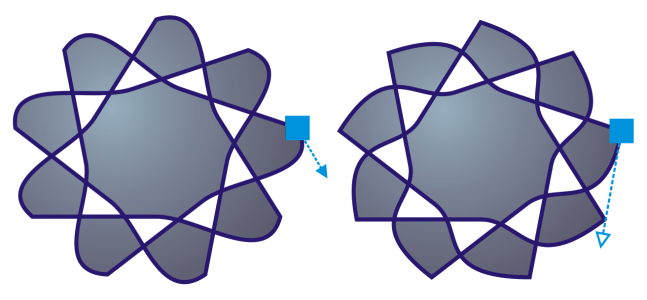
Usually, a control handle is displayed as a solid blue arrowhead (left). When a control handle overlaps with a node, it is displayed as an unfilled blue arrowhead beside the node (right).
You can reposition a node by specifying its coordinates.
The Shape tool is the standard tool for moving nodes. You can also set an option to use the Pick and Bézier tools for selecting and moving nodes.
To select a node
You can also select a node by using the Pick ![]() , Freehand
, Freehand ![]() , Bézier
, Bézier ![]() , or Polyline
, or Polyline ![]() tool. To do this, first click Tools
tool. To do this, first click Tools ![]() Options
Options ![]() CorelDRAW. Click Nodes and Handles, and enable the Enable node tracking check box. Click a curve object, move the pointer over a node until the tool’s shape state cursor
CorelDRAW. Click Nodes and Handles, and enable the Enable node tracking check box. Click a curve object, move the pointer over a node until the tool’s shape state cursor ![]() appears, and click the node. Note that when the Enable node tracking check box is enabled, you can no longer select and move an object by clicking and dragging any of its nodes.
appears, and click the node. Note that when the Enable node tracking check box is enabled, you can no longer select and move an object by clicking and dragging any of its nodes.
To select all nodes on a selected curve, double-click the Shape tool.
To move a node
You can also move a node by using the Pick ![]() , Freehand
, Freehand ![]() , Bézier
, Bézier ![]() , or Polyline
, or Polyline ![]() tool. To do this, first click Tools
tool. To do this, first click Tools ![]() Options
Options ![]() CorelDRAW. Click Nodes and Handles, and make sure that the Enable node tracking check box is enabled. Click a curve object, move the pointer over a node until the tool’s shape state cursor
CorelDRAW. Click Nodes and Handles, and make sure that the Enable node tracking check box is enabled. Click a curve object, move the pointer over a node until the tool’s shape state cursor ![]() appears, and drag the node.
appears, and drag the node.