Quick links to procedures on this page:
Corel DESIGNER lets you draw rectangles and squares. You can draw a rectangle or square by dragging diagonally with the 2-point rectangle tool or by specifying the width and height with the 3-point rectangle tool. The 3-point rectangle tool lets you quickly draw rectangles at an angle.
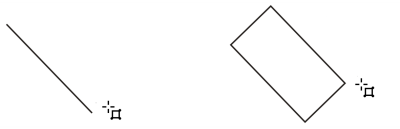
You can create a 3-point rectangle by first drawing its baseline and then drawing its height. The resulting rectangle is angled.
You can also draw a rectangle or square with rounded, scalloped or chamfered corners. You can modify each corner individually or apply the changes to all corners. In addition, you can specify that all corners scale relative to the object. You can also specify the default corner size for drawing rectangles and squares.
Understanding rounded, scalloped, and chamfered corners
Rounding produces a curved corner, scalloping replaces the corner with an edge that has a curved notch, and chamfering replaces the corner with a straight edge, also known as a bevel.
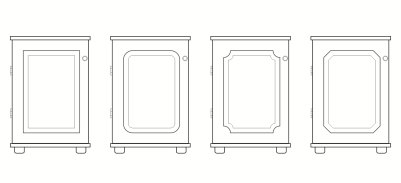
The cabinet doors have different styles applied to the corners. From left to right you can see standard corners with no changes, filleted corners, scalloped corners, and chamfered corners.
To draw rectangles or squares with rounded, scalloped, or chamfered corners, you need to specify the corner size. For rounding or scalloping a corner, the corner size determines the corner radius. The radius is measured from the curve’s center to its perimeter. Higher corner size values produce more rounded corners or deeper scalloped corners.
From left to right, you can see the radius of a rounded corner and the radius of a scalloped corner.
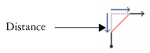
The size value for chamfering a corner represents the distance from the original corner to the beginning of the chamfered edge. Higher values produce a longer chamfered edge.
For more information about modifying the corners of curve objects, such as lines, text, or bitmaps, see "Filleting, scalloping, and chamfering corners of curve objects" on page 87.
|
|
|
|
|
In the toolbox, click the 2-point rectangle tool  . Drag in the drawing window until the rectangle is the size you want.
|
|
|
In the toolbox, click the 2-point rectangle tool . Hold down Ctrl, and drag in the drawing window until the square is the size you want.
|

You can draw a rectangle from its center outward by holding down Shift as you drag. You can also draw a square from its center outward by holding down Shift + Ctrl as you drag.
To constrain the angle of the baseline to a preset increment, known as constrain angle, hold down Ctrl as you drag. For information about changing the constrain angle, see To constrain an object while drawing or editing.
|
|
|
|
|
Click the Edit corners together button  on the property bar.
|
|
|
Click the Relative corner scaling button  on the property bar.
|

If you modify the corners of a rectangle or square and save it to a previous version of Corel DESIGNER, the shape may be converted to curves.
You can also modify the corners of a selected rectangle or square by clicking the Shape tool  , clicking a corner option button on the property bar, and then dragging a corner node toward the shape’s center. If you want to modify only one corner, hold down Ctrl as you drag.
| 2 . |
Double-click Toolbox from the Workspace list of categories. |
| 3 . |
Click Rectangle tool. |
| 4 . |
In the Rectangle corners area, type values in the boxes. |
Copyright 2017 Corel Corporation. All rights reserved.