Quick links to procedures on this page:
You can hide an object from view and change the stacking order of objects.
Displaying and hiding objects
By default, all objects are displayed in the image window. However, you can hide an object to make it temporarily invisible.
Changing the order of objects
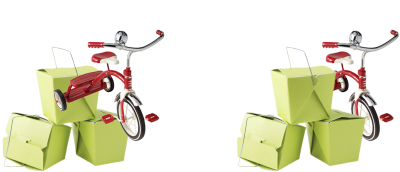
When you create multiple objects in an image, they are stacked on top of one another in the order in which they were created. The most recently created object is at the top of the stack, and the image background is at the bottom. You can move an object in the image window to cover an object that is lower in the stacking order; however, an object always displays behind objects that are higher in the stacking order. Changing the stacking order of objects brings hidden objects into view or places the topmost objects behind other objects.
Changing the stacking order places the bike behind the boxes.
|
If the Object manager docker is not open, click Window  Dockers Dockers  Object manager. Object manager. |

When an object is hidden, the Hide/Show icon  is not displayed.

When you hide the background, a checkered transparency grid displays. To customize the transparency grid, click Tools  Options. In the Workspace list of categories, click Display. In the Display dialog box, modify any attributes in the Transparency grid area.
| 2 . |
Click Object  Arrange Arrange  Order, and click one of the following: Order, and click one of the following: |
|
• |
To front — places the selected object in front of all objects in the image |
|
• |
To back — places the selected object behind all objects in the image |
|
• |
Forward one — places the selected object in front of the object it is currently behind |
|
• |
Back one — places the selected object behind the object it is currently in front of |
|
• |
Reverse order — reverses the stacking order of the selected objects. This command is available only when multiple objects are selected. |

The image background is always placed at the bottom of the stacking order and no object can be placed below it.
When objects are grouped, they are considered to be at the same level in the stacking order. Therefore, you cannot place an object between individual objects in a group.

You can change the stacking order of an object by dragging its thumbnail to a new position in the Object manager docker. If the Object manager docker is not open, click Window  Dockers
  Object manager.
You can also change the order of objects using shortcut keys. Move an object to the top of the stack by pressing Shift + Page up; move it to the bottom of the stack, but above the background, by pressing Shift + Page down; move it up one step in the stacking order by pressing Ctrl + Page up; and move it down one step by pressing Ctrl + Page down.

Not all suite components documented in this Help are available in our Trial, Academic, and OEM versions. Unavailable components may include Corel applications, product features, third-party utilities, and extra content files.
Copyright 2017 Corel Corporation. All rights reserved.

is not displayed.
![]() Options. In the Workspace list of categories, click Display. In the Display dialog box, modify any attributes in the Transparency grid area.
Options. In the Workspace list of categories, click Display. In the Display dialog box, modify any attributes in the Transparency grid area.![]() Dockers
Dockers ![]() Object manager.
Object manager.![]()