| • | To scale an image by using Smart Carver |
| • | To remove an area as you scale an image |
Smart Carver lets you selectively remove or protect areas when you scale an image.
You can also scale an image by using the Resample feature. For more information, see Changing image dimensions, resolution, and paper size.
| To scale an image by using Smart Carver |
|
| 1 . | Choose Image |
| 2 . | In the Smart carving area, perform one or more tasks from the following table, and click OK. |
| The preview window displays the results of your actions. |
|
Specify a value in the Width box.
|
|
|
Specify a value in the Height box.
|
|
|
Click the Contract the image horizontally button
|
|
|
Click the Contract the image vertically button
|
|
|
Click the Expand the image horizontally button
|
|
|
Click the Expand the image vertically button
|
You can also save the current settings in the Smart carver dialog box by clicking the Save preset button ![]() , and specifying a name in the Setting name box.
, and specifying a name in the Setting name box.
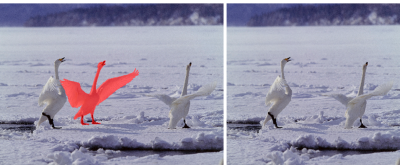
| To remove an area as you scale an image |
|
| 1 . | Choose Image |
| 2 . | In the Object removal area, click the Remove button |
| 3 . | In the preview window, paint over the image areas that you want to remove. |
| A red overlay appears over the selected areas. |
| 4 . | Click the Auto-contract horizontally |
| 5 . | Click the Background fusion button to smooth over the region where the area was cut out and the remaining parts merged. |
|
Click the Preserve button
|
|
|
Click the Eraser button
|
|
|
Enable the Hide mask check box.
|
|
|
Click Reset.
|
|
|
Click the Undo button
|
|
|
Click the Redo button
|
|
|
Click the Pan button
|
|
|
Click the Zoom to 100% button
|
|
|
Click the Zoom to fit button
|
![]()
Not all suite components documented in this Help are available in our Trial, Academic, and OEM versions. Unavailable components may include Corel applications, product features, third-party utilities, and extra content files.
Copyright 2017 Corel Corporation. All rights reserved.