
| • | To clone an image area or object |
| • | To retouch image areas using sampled texture |
You can copy pixels from one image area to another in order to cover damaged or unwanted elements in an image. For example, you can fix a tear or remove a person from an image by applying cloned pixels over the area you want to remove. You can also clone image elements you like and apply them to another image area or a second image. If you clone an object, the newly cloned areas are added to the active object. You can also create abstract images, based on pixels sampled from the original image.
The Clone tool was used to remove the woman’s necklace.
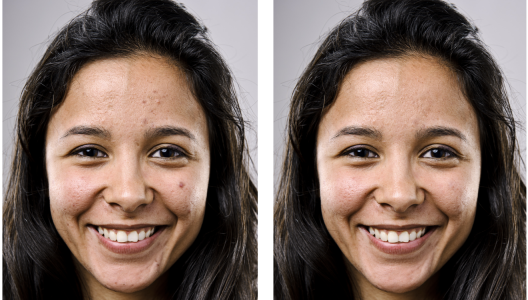
Some imperfections were removed from the girl’s face on the left by painting with sampled texture.
| To clone an image area or object |
|
| 1 . | In the toolbox, click the Clone tool |
| 2 . | Open the Brush picker on the property bar, choose a clone category, and then choose a clone type. |
| 3 . | Specify the settings you want on the property bar. |
| 4 . | Click the image to set a source point for the clone. |
| If you want to reset the source point, right-click the area you want to clone. |
| 5 . | Drag the clone brush in the image window to apply the pixels from the source point. |
|
Click Impressionism clone
|
|
|
Click the Toggle cumulative button
|
|
|
Click the Toggle merge source button
|
|
|
Hold down Shift, and drag towards or away from the nib center.
|
|
|
Hold down Alt, and click in the image window without releasing the mouse button to display a transparency slider.
|
|
|
Hold down Ctrl + Alt, and click in the image window without releasing the mouse button to display a transparency slider.
|
|
|
Hold down Shift + Alt, and drag in the image window.
|
|
|
Hold down Ctrl, and drag in the image window. To change the direction (from vertical to horizontal or vice versa), hold down Shift.
|
|
|
Right-click to set the source point and start cloning. Hold down Ctrl + Alt + Shift, and click in the image window to clone in a straight line.
|
| To retouch image areas using sampled texture |
|
| 1 . | In the toolbox, click the Healing Clone tool |
| 2 . | Specify the settings you want on the property bar. |
| 3 . | Click the image to set a source point, sampling the texture that you want. |
| If you want to reset the source point, right-click the area that you want to sample. |
| 4 . | Drag across the area that you want to cover. |
|
Hold down Shift + Alt, and drag in the image window.
|
|
|
Hold down Shift, and drag towards or away from the nib center.
|
|
|
Click Window
|
|
|
On the property bar, click the Preview button to disable it.
|
![]()
Not all suite components documented in this Help are available in our Trial, Academic, and OEM versions. Unavailable components may include Corel applications, product features, third-party utilities, and extra content files.
Copyright 2018 Corel Corporation. All rights reserved.