Quick links to procedures on this page:

Expanding and contracting editable areas

You can add parts to and remove parts from an editable area.

By default, each editable area that you define replaces the last one defined. However, you can use the following mask modes if you want to retain the current editable area but modify its shape:


A mask mode remains active until you change modes. The following examples illustrate the use of the different mask modes.


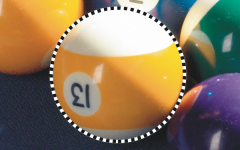
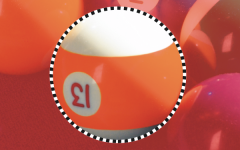
The Ellipse mask tool is used in the Normal mode.

The entire ball is defined as an editable area in the resulting mask.

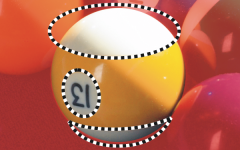
The Ellipse mask and Freehand mask tools are used in the Subtractive mode.

The resulting editable area consists of the yellow areas of the ball.

The Magic wand mask tool is used in the Additive mode.

The numbers are now added to the editable area.

The Ellipse mask tool is used in the Overlap mode.

The overlapping areas — the yellow areas and numbers — are removed from the editable area, and the white areas are added to it.

Removing protected areas

You can remove protected areas from within an editable area. This feature is useful for modifying color masks that have large editable areas.

Specifying number of pixels

You can expand and contract an editable area by a specific number of pixels. The pixels are added to or removed from the edge of the editable area.

Adding pixels of similar color

You can add adjacent pixels of a similar color to an editable area. The editable area expands until it reaches pixels with colors that are too dissimilar from the colors in the original editable area. The color tolerance value you specify sets the percentage of color variation allowed between the pixels in the original editable area and the adjacent protected areas.

You can also add all pixels of similar color to an editable area regardless of whether they are adjacent to those in the current editable area. The color tolerance value you specify sets the percentage of color variation allowed between the pixels in the original editable areas and the protected areas.

To add to or subtract from an editable area Back to Top

*

After you begin to drag, you can use Ctrl and Shift to constrain the shape of the area you add or subtract. For example, if you’re using the Ellipse mask tool, holding down Ctrl constrains the shape to a circle, and holding down Ctrl + Shift makes the circle expand from the center.

To remove protected areas from an editable area Back to Top
To expand or contract an editable area Back to Top


Click Mask Mask outline Expand, and type a value in the Width box.
Click Mask Mask outline Contract, and type a value in the Width box.
To add adjacent pixels of similar color to an editable area Back to Top

Not all suite components documented in this Help are available in our Trial, Academic, and OEM versions. Unavailable components may include Corel applications, product features, third-party utilities, and extra content files.


Feedback
Was this page helpful? Send feedback. (Internet connection required.)

Copyright 2018 Corel Corporation. All rights reserved.