Quick links to procedures on this page:
Corel PHOTO-PAINT provides you with filters (adjustment effects) and tools to make adjustments to the color and tone of images. When you adjust the color and tone, you adjust elements such as hue, saturation, brightness, contrast, or intensity. If you want to adjust the color and tone of the entire image, you can apply an adjustment filter directly to the image or apply a lens that exists on a separate object layer and can be edited without changing the original image. For information about lenses, see Working with lenses.
You can adjust part of an image by editing the size and shape of a lens or by creating an editable area before applying an adjustment filter. For information about editable areas, see Working with masks.
Before you start working with individual filters, try using the Image Adjustment Lab. For information about the Image Adjustment Lab, see Using the Image Adjustment Lab.
The table below lists the filters that can be used to make adjustments to images.
Choosing color and tone filters
Some filters adjust an image automatically, while others give you various degrees of control. For example, the Auto adjust filter adjusts the tonal range across all color channels automatically, while the Tone curve filter lets you use separate color channels to pinpoint and adjust tone or color. More advanced filters, such as the Tone curve filter and the Contrast enhancement filter, are precise and can correct many different problems, but using them requires practice.
Using histograms
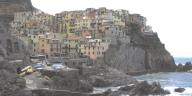
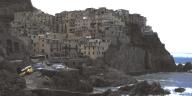
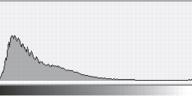
You can view the tonal range of an image by using a histogram to evaluate and adjust the color and tone. For example, a histogram can help you detect hidden detail in a photo that is too dark because of underexposure (a photo taken with insufficient light).
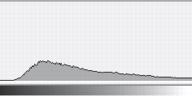
A histogram has a horizontal bar chart that plots the brightness values of the pixels in your image on a scale of 0 (dark) to 255 (light). The left part of the histogram represents the shadows of an image, the middle part represents the midtones, and the right part represents the highlights. The height of the spikes indicates how many pixels are at each brightness level. For example, a large number of pixels in the shadows (the left side of the histogram) indicates the presence of image detail in the dark areas of the image.
A histogram is available with the following filters:
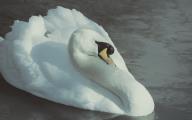
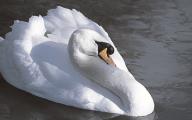
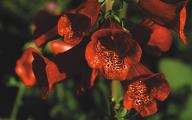
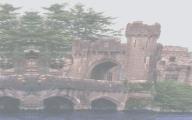
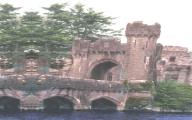
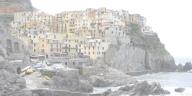
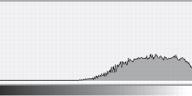
Each photo above has a different exposure: average (top), overexposed (middle), underexposed (bottom). The histograms for each photo (on the right) show how the pixels are distributed, from dark to light. In a photo with average exposure, pixels are more evenly distributed across the tonal range.
Adjusting color and tone by using brush effects
You can adjust the brightness, contrast, hue or saturation in part of an image by applying brush effects. For example, if you want to lighten one object in a photo, you can use the Brightness tool to lighten the area you want without affecting the surrounding area.
You can use preset brushes or create a custom brush. For more information, see Creating custom brushes.
| 1 . |
Click Adjust, and click an adjustment filter. |

For descriptions of adjustment filters, see Exploring adjustment filters.

You can compare the original image with the adjusted image by clicking the Dual window preview button  in filter dialog boxes.
You can adjust the color and tone in an editable area by defining an editable area before you click an adjustment filter.
| 1 . |
Click Adjust  Contrast enhancement. Contrast enhancement. |
| 2 . |
Move the Input value clipping arrows  to adjust shadows and highlights. to adjust shadows and highlights. |
| 3 . |
Move the Gamma slider to adjust the midtones. |
| 4 . |
Move the Output range compression arrows  to fine-tune the contrast. to fine-tune the contrast. |
|
|
|
|
|
|
|
|
Enable the Auto-adjust check box.
|
|
|
Enable the Set input values or Set output values option from the Eyedropper sampling area. Click the Shadow eyedropper button  to sample shadow areas, or click the Highlight eyedropper button  to sample highlight areas.
|
The histogram displays adjusted values as a black outline and original values as gray shading.
You can compare the original image with the adjusted image by clicking the Dual window preview button in filter dialog boxes.
|
• |
Hue  — shifts all hues along the color wheel by the number of degrees that you specify in the Amount box — shifts all hues along the color wheel by the number of degrees that you specify in the Amount box |
|
• |
Sponge  — saturates or desaturates the colors — saturates or desaturates the colors |
|
• |
Tint  — uses the current paint color to tint the image — uses the current paint color to tint the image |
|
• |
Dodge/Burn  — brightens (overexposes) or darkens (underexposes) the image. You can choose a Dodge or Burn preset brush from the Brush type list box. — brightens (overexposes) or darkens (underexposes) the image. You can choose a Dodge or Burn preset brush from the Brush type list box. |
|
|
|
|
|
In the Brush settings docker, click the Cumulative button  on the Stroke attributes bar. This option is available for only some of the Effect tools. If the Brush settings docker is not open, click Window Dockers Brush settings.
|
|
|
In the Brush settings docker, click the Merge source button  on the Dab attributes bar. This option is available only when the Cumulative button is disabled.
|
Copyright 2015 Corel Corporation. All rights reserved.