Quick links to procedures on this page:
The Cutout Lab lets you cut out image areas from the surrounding background. This feature allows you to isolate image areas and preserve edge detail, such as hair or blurred edges.
To cut out an image area, you draw a highlight over its edges and then apply a fill to define the inside of the area. To evaluate the results, you can preview the cutout with the background removed or against a background of gray, white, or black. You can also preview the cutout with the original image showing underneath and with the highlight and fill displayed. If necessary, you can touch up the cutout by adding or removing detail along its edges.
If you make a mistake, you can erase and redo sections of the highlighted and filled area, undo or redo an action, or revert to the original image.
By default, the cutout is placed as an object in the image window and the original image is removed. You can also choose to keep both the cutout and the original image, or create a clip mask from the cutout.
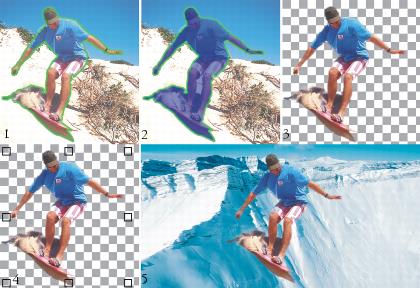
Cutout Lab workflow: (1) Highlight the edges of the image area; (2) Add a fill to the inside. (3) Preview the cutout and touch it up if needed. (4) Bring the cutout into the image window. (5 — optional) Place the cutout against a background image.
You can set options for some of the tools in the Cutout Lab. For example, you can customize the thickness of the highlight by changing the nib size of the Highlighter tool. If an image area has hard edges, you can use a thinner line to define its edges more precisely. Conversely, if an image area has blurred or wispy edges that are hard to define, you can use a thicker line. Also, you can change the highlight and the fill color to make them more visible.
You can also zoom in to get a closer look at image detail or zoom out to view a larger area of the image. You can pan to view image areas that fall outside the preview window.
| 1 . |
Click Image  Cutout Lab. Cutout Lab. |
| 4 . |
Click the Inside fill tool  , and click inside the area you want to cut out. , and click inside the area you want to cut out. |
| 6 . |
From the Cutout results area, choose any of the following options: |
|
• |
Cutout — creates an object from the cutout and discards the original image |
|
• |
Cutout as clip mask — creates a clip mask from the cutout and attaches the clip mask to the original image. A clip mask is a mask that is attached to an object and lets you change the transparency of an object without permanently affecting it. If you created a cutout from a background image, the background is converted to an object. |
|
|
|
|
|
Click the Eraser tool  , and drag over the highlight and fill that you want to delete. The Eraser tool is available before you click Preview.
|
|
|
Click the Undo  or Redo  button.
|
|
|
|
|
|
In the Preview settings area, enable any of the following check boxes:
From the Background list box, choose any of the following options:

|
None — displays the cutout against a black-and-white checkered pattern. If the Show original image check box is enabled, the removed areas appear under a semitransparent black-and-white checkered pattern. |
|
|
Grayscale — displays the cutout against a gray background. If the Show original image check box is enabled, the removed areas are tinted gray. |
|
|
Black matte — displays the cutout against a black background. If the Show original image check box is enabled, the removed areas are tinted black. |
|
|
White matte — displays the cutout against a white background. If the Show original image check box is enabled, the removed areas are tinted white. |
|

The Cutout Lab supports RGB, CMYK, grayscale, paletted, and Lab images. When brought into the Cutout Lab, grayscale, paletted, and Lab images are automatically converted to RGB or CMYK images, which may result in a slight color shift. The original image colors are restored after you apply or cancel the Cutout Lab command.

You can switch from the Highlighter to the Eraser tool, and from the Eraser to the Highlighter tool by right-clicking and dragging in the preview window.
You can switch from the Add detail to the Remove detail tool, and from the Remove detail to the Add detail tool by right-clicking and dragging in the preview window.
| 1 . |
Click Image Cutout Lab. |
You can change the nib size of the Highlighter, Eraser, Add detail, and Remove detail tools interactively by holding down Shift while dragging a tool.
| 1 . |
Click Image Cutout Lab. |
|
|
|
|
|
Using the Zoom in  or Zoom out tool  , click in the preview window.
|
|
|
Click the 100%  button.
|
|
|
Click the Zoom to fit  button.
|
|
|
Using the Pan tool  , drag the image until the area you want to see is visible.
|
Copyright 2015 Corel Corporation. All rights reserved.