| • | To use the Image Adjustment Lab |
| • | To view images in the Image Adjustment Lab |
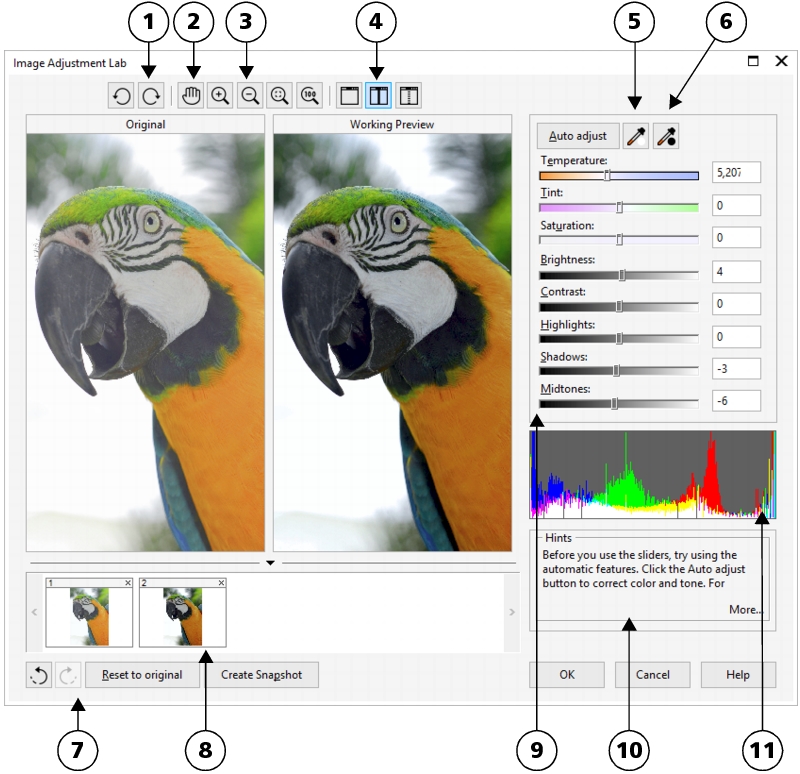
The Image Adjustment Lab lets you correct the color and tone of most photos quickly and easily.
The Image Adjustment Lab consists of automatic and manual controls, which are organized in a logical order for image correction. By starting in the upper-right corner and working your way down, you can select the controls you need to correct the problems specific to your image. It is best to crop or retouch any areas of the image before beginning the color and tone corrections. For information about cropping and retouching images, see Cropping images and Retouching.
While you work in the Image Adjustment Lab, you can take advantage of the following features:
| • | Create snapshot — You can capture the corrected version of an image in a "snapshot" at any time. Thumbnails of the snapshots appear in a window below the image. Snapshots make it easy to compare different corrected versions of the image so you can choose the best one. |
| • | Undo, Redo, and Reset to original — Image correction can be a trial and error process, so the ability to undo and redo corrections is important. The Reset to original command lets you clear all corrections so that you can start again. |
You can begin by using the automatic correction controls:
| • | Auto adjust — automatically corrects the contrast and color in an image by detecting the lightest and darkest areas and adjusting the tonal range for each color channel. In some cases, this control may be all you need to improve an image. In other cases, you can undo the changes and proceed with more precise controls. |
| • | Select white point tool — automatically adjusts the contrast in an image according to the white point that you set. For example, you can brighten an image that is too dark by using the Select white point tool. |
| • | Select black point tool — automatically adjusts the contrast in an image according to the black point that you set. For example, you can darken an image that is too light by using the Select black point tool. |
Using color correction controls
| • | Temperature slider — lets you correct color casts by "warming" or "cooling" the color in an image to compensate for the lighting conditions at the time the photo was taken. For example, to correct a yellow color cast caused by taking a photo indoors in dim incandescent lighting, you can move the slider toward the blue end to increase the temperature values (based on degrees Kelvin). Lower values correspond to low lighting conditions, such as candlelight or light from an incandescent light bulb; these conditions cause an orange cast. Higher values correspond to intense lighting conditions, such as sunlight; these conditions cause a blue cast. |
| • | Tint slider — lets you correct color casts by adjusting the green or magenta in an image. You can add green by moving the slider to the right; you can add magenta by moving the slider to the left. Moving the Tint slider after using the Temperature slider lets you fine-tune an image. |
| • | Saturation slider — lets you adjust the vividness of colors. For example, by moving the slider to the right, you can increase the vividness of a blue sky in an image. By moving the slider to the left, you can reduce the vividness of colors. You can create a black-and-white photo effect by moving the slider all the way to the left, so that all color in the image is removed. |
Adjusting brightness and contrast across the entire image
You can brighten, darken, or improve the contrast in an image by using the following controls:
| • | Brightness slider — lets you brighten or darken an entire image. This control can correct exposure problems caused by too much light (overexposure) or too little light (underexposure) at the time the photo was taken. If you want to lighten or darken specific areas of an image, you can use the Highlights, Shadows, and Midtones sliders. Adjustment made by the Brightness slider is nonlinear, so the current white point and black point values are not affected. |
| • | Contrast slider — increases or decreases the difference in tone between the dark and light areas of an image. Moving the slider to the right makes the light areas lighter and the dark areas darker. For example, if the image has a dull, gray tone, you can sharpen the detail by increasing the contrast. |
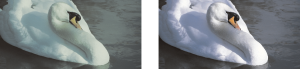
Adjusting the brightness and contrast of an image can reveal more image detail.
Adjusting highlights, shadows, and midtones
| • | Highlights slider — lets you adjust brightness in the lightest areas of an image. For example, if you take a photo with a flash, and the flash washes out the foreground subjects, you can move the Highlights slider to the left to darken the washed-out areas of the image. You can use the Highlights slider in conjunction with the Shadows and Midtones sliders to balance the lighting. |
| • | Shadows slider — lets you adjust the brightness in the darkest areas of an image. For example, a bright light behind a photo subject (backlighting) at the time a photo is taken can cause the subject to appear in shadow. You can correct the photo by moving the Shadow slider to the right to lighten the dark areas and reveal more detail. You can use the Shadows slider in conjunction with the Highlights and Midtones sliders to balance the lighting. |
| • | Midtones slider — lets you adjust the brightness of the midrange tones in an image. After adjusting the highlights and shadows, you can use the Midtones slider to fine-tune the image. |
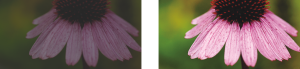
The Highlights and Shadows sliders can lighten or darken specific areas of an image.
The histogram lets you view the tonal range of an image to help you evaluate and adjust the color and tone. For more information about the histogram, see Using histograms.
Viewing images in the Image Adjustment Lab
Using other adjustment filters
Although the Image Adjustment Lab lets you correct the color and tone of most images, a specialized adjustment filter is sometimes required. Using the powerful adjustment filters in Corel PHOTO-PAINT, you can make precise adjustments to images. For example, you can adjust images by using a histogram or a tone curve. For more information about adjustment filters, see Using individual color-adjustment effects and tools.
| To use the Image Adjustment Lab |
|
| 1 . | Click Adjust |
| 2 . | Click Auto adjust. |
| Auto adjust automatically adjusts color and contrast by setting the white point and black point for an image. |
| If you want to control the white point and black point setting more precisely, click the Select white point tool |
| 3 . | Perform one or more tasks from the following table. |
|
Adjust the Temperature slider to warm or cool the colors, and then fine-tune the color correction by adjusting the Tint slider.
|
|
|
Move the Saturation slider to the right to increase the amount of color in the image; move the slider to the left to decrease the amount of color in the image.
|
|
|
Move the Brightness slider to the right to lighten the image; move the slider to the left to darken the image.
|
|
|
Move the Contrast slider to the right to make the light areas lighter and the dark areas darker.
|
|
|
Adjust the Highlights slider to brighten or darken the lightest areas of the image. Then, adjust the Shadows slider to lighten or darken the darkest areas of the image. Finally, adjust the Midtones slider to fine-tune the midrange tones in the image.
|
The Image Adjustment Lab is not available for CMYK images. For CMYK images, you can access the Auto Adjust filter and other adjustment filters from the Adjust menu.
You can capture the current version of your image by clicking the Create snapshot button. Thumbnails of the snapshots appear in a window below your image. Each snapshot is numbered sequentially and can be deleted by clicking the close button in the upper right corner of the snapshot title bar.
You can undo or redo the last correction you made by clicking the Undo button ![]() or Redo button
or Redo button ![]() . To undo all corrections, click the Reset to original button.
. To undo all corrections, click the Reset to original button.
| To view images in the Image Adjustment Lab |
|
| 1 . | Click Adjust |
| 2 . | Perform a task from the following table. |
|
Using the Pan tool
|
|
|
Click the Zoom to fit
|
|
|
Click the 100%
|
|
|
Click the Full preview button
|
|
|
Click the Before and after full preview button
|
|
|
Click the Before and after split preview button
|
Copyright 2016 Corel Corporation. All rights reserved.