Quick links to procedures on this page:
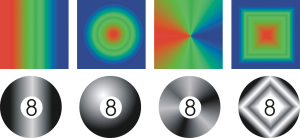
Fountain fills gradually change from one color to the next, along a linear, elliptical, conical, or rectangular path. You can use fountain fills to create the illusion of depth. Fountain fills are also known as gradient fills.
You can choose fountain fills from a personal library or from the Content Exchange. You can browse the available fountain fills, search by keyword, mark fills as favorites, vote for fills that you like, or copy fills from the Content Exchange to your personal library. For more information, see Managing fills and transparencies.
Any fountain fill can be modified to suit your needs, and you can create your own fills. Fountain fills can contain two or more colors, which you can position anywhere in the fill’s progression. You can specify fill attributes such as the direction of a fill’s color blend, the fill’s angle, center point, and midpoint. You can also smooth, skew, or repeat a fill.
After you create a fountain fill, you can save it for future use or share it with other users on the Content Exchange. For more information, see Saving and sharing fills and transparencies.
You can also apply a fountain fill interactively by using the Interactive fill tool. A gradient arrow, which marks the transition from one color to another, appears in the image window. Each color in the fountain fill is represented by a square node on the gradient arrow. You can change and add colors or adjust the transparency of individual colors. You can also adjust the size and direction of the fountain fill in the image window.
Linear, elliptical, conical, and rectangular fountain fills
| 2 . |
Click the Fountain fill button  on the property bar. on the property bar. |
| 3 . |
Open the Fill picker on the property bar, and click a fill thumbnail. |
| 4 . |
Click the Select button in the pop-up window that appears. |

Merge modes control the way the foreground or fill color blends with the base color of the image. You can change the merge mode setting from the default (Normal) for specific blending purposes. For more information about merge modes, see Understanding merge modes.
| 2 . |
Click the Fountain fill button on the property bar. |
| 3 . |
Click the Edit fill button  on the property bar. on the property bar. |
| 4 . |
In the Edit fill dialog box, click one of the following buttons to choose a fountain fill type: |
Fountain fills can contain up to 99 colors.

You can change the color of a node by clicking the node and clicking a color on the color palette.
|
If you want to fill an object, you must select it by using the Object pick tool  before applying the fill, and then click the Lock object transparency button before applying the fill, and then click the Lock object transparency button  in the Object manager docker to protect the object’s shape and transparency. in the Object manager docker to protect the object’s shape and transparency. |
You can also create a mask to constrain the fountain fill to a portion of the image. For more information, see Working with masks.
Copyright 2016 Corel Corporation. All rights reserved.