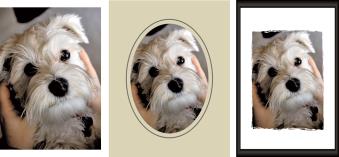
You can add picture frames to your images to provide an eye-catching final touch. You can choose square or oval frames, modern or classic frames, mats or photo edges, or a variety of other styles.The frame is applied on a separate layer, which can be edited like any other layer.

You can add a frame around your image.
Edit workspace
|
2
|
In the Picture Frame group box, choose a frame from the drop-list. |
|
3
|
In the Orientation group box, choose one of the following options: |
|
• |
Frame canvas — sizes the frame to the canvas. The frame layer is named "Picture Frame" on the Layers palette. Successive frames reside on layers named "Picture Frame 1," "Picture Frame 2," and so on. |
|
• |
Frame current layer — sizes the frame to the current layer (which may have a different size than the canvas). For example, if you are creating a collage of photos for a scrapbook and each photo is on a separate layer, you can frame each photo by choosing this option. The frame layer is named after the original layer with the words "Picture Frame" appended to the name. |
|
• |
Frame outside of the image — increases the canvas size to accommodate the frame. The added canvas uses the current background color if the frame is applied to the Background layer. If the frame is applied to any other layer, the extra canvas is transparent. |
|
• |
Flip frame — reverses the frame along its horizontal axis |
|
• |
Rotate frame right — lets you rotate the frame clockwise when the image is taller than it is wide |

If the width and height differ by a considerable amount, the frame appears thicker along the shorter sides.

If you select a frame in step 2 that contains transparent areas, you can choose to keep these frame area transparent, or you can substitute a color. To maintain frame transparency, mark the Keep transparent check box. To substitute a color, unmark the check box, and choose a color from the color box.
Copyright 2013 Corel Corporation. All rights reserved.
