The Time Machine lets you recreate some popular photographic styles from the past. It lets you choose from seven styles, which range from the year 1839 to the 1980s. For information about the Time Machine, see Creating vintage-style photos with the Time Machine.
Corel PaintShop Pro lets you experiment with effects that are inspired by different types of camera film and filters. For information about applying film and filter effects, see Applying film and filter effects to photos.
Original photo (left) and the same photo with the Infrared Film effect applied (right)
An urban scene (left) appears to be transformed into a miniature model (right).
You can also use Selective Focus to apply a quick depth of field effect to any photo. For general information about depth of field, see Controlling depth of field.
Photo tip: Photos taken from high vantage points usually make the best candidates for a miniature effect.
Inspired by photos taken spontaneously with a vintage-style pocket camera, such as LOMO, Diana, or Holga, the Retro Lab lets you apply a fun retro effect. For more information, see Using Retro Lab.
You can apply a color gradient to your photos to simulate the effect achieved by using a graduated filter on your camera lens. For more information, see Applying a gradient with the Graduated Filter effect.
| To apply the Black and White Film effect |
|
| 1 | Choose Effects |
| The Black and White Film dialog box appears. |
| 2 | Modify the settings you want and click OK. |
|
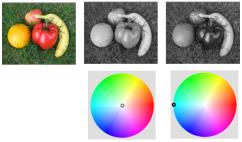
In the Filter Color group box, click or drag inside the color spectrum to set the RGB filter color.
The Red, Green, and Blue values and the After pane are updated.
|
|
|
In the Filter Color group box, place the filter toward the middle of the color spectrum, or click the Reset to Default button
|
|
|
In the Filter Color group box, click Suggest Color.
|
|
|
In the Adjustments group box, drag the Brightness slider, or type or set a value in the control.
|
|
|
In the Adjustments group box, drag the Clarify slider, or type or set a value in the control.
|
| To apply the Infrared Film effect |
|
| 1 | Choose Effects |
| The Infrared Film dialog box appears. |
| 2 | Type or set a value in the Strength control to determine the overall strength of the Infrared effect. |
| Higher settings make greens appear brighter and blues appear darker. Setting the value to 0 creates a grayscale image. |
| 3 | Type or set a value in the Flare control to apply a halo effect to lighter areas in the photo. |
| Higher settings intensify the halation effect, producing soft edges throughout the photo. Lower settings minimize the halation effect. |
| 4 | Type or set a value greater than 0 in the Grain control to add a more realistic infrared graininess to the photo. |
| 5 | Click OK. |
| To apply the Sepia Toning effect |
|
| 1 | Choose Effects |
| The Sepia Toning dialog box appears. |
| 2 | Type or set a value in the Amount to age control to determine the strength of the effect. |
| Higher settings increase the effect by increasing the amount of brown in the image. |
| To apply a miniature effect by using Selective Focus |
|
| 1 | Choose Effects |
| The Selective Focus dialog box appears. You can maximize the dialog box to increase the size of the Before and After panes of the preview area. |
| 2 | In the Area of focus, click one of the following tools: |
| • | Planar Selection Tool |
| • | Half Planar Selection Tool |
| • | Radial Selection Tool |
| 3 | In the Before pane of the preview area, when your pointer displays the move cursor |
| 4 | Drag the rotation handle (the box at the end of the short line) to rotate the area of focus. |
| 5 | Drag a sizing handle (on the solid lines) to set the edges for the area of focus. |
| 6 | Fine-tune the results by dragging any of the following sliders: |
| • | Blur amount — determines the amount of blur outside the area of focus |
| • | Feather edge — determines the softness of the transition between the area in focus and the blurred areas. You can also adjust feathering interactively by dragging a feathering handle (on the dotted lines) in the Before pane. |
| • | Saturation — determines the intensity of the colors in the photo. Increasing saturation can help simulate the vivid paint colors used for models and toys. |
| To apply a Vignette effect |
|
| 1 | Click Effects |
| 2 | In the Area of focus, choose a selection tool and drag in the Before pane to set the edge for the effect. |
| 3 | Drag the Dark/Light slider to set an edge color. |
| 4 | Fine-tune the results by dragging any of the following sliders: |
| • | Blur — determines the amount of blur outside the area of focus |
| • | Diffuse glow — adds a luminescent brightening effect and softens details in the entire photo |
| • | Feather edge — determines the softness of the transition between the area in focus and the edge effect |