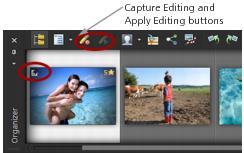
In the Manage workspace, you can copy the edits you make to one photo and apply them to as many photos as you want. For example, you can easily apply a lighting correction to multiple photos, or apply the same border and resizing options to a set of photos that you’re preparing for a website.
After you edit a photo in the Adjust or Edit workspace, a small editing icon appears on the photo’s thumbnail. When you return to the Manage workspace, you can access the Capture editing and Apply editing commands to copy the changes to other photos.

An icon in the lower-left corner of a thumbnail indicates that the edits to the photo can be copied and applied to other photos.
You can capture and apply edits to most file types, but edits to RAW files can be applied only to other RAW files. You can undo the edits you apply to one or more photos.
Manage workspace
|
3
|
Click the Capture Editing  button on the Organizer toolbar. button on the Organizer toolbar. |

You can capture the edits of both open or closed files for the current session only. When you close the program, all captured edits are automatically deleted.

You can also capture the edits by right-clicking the selected thumbnail and choosing Capture Editing.
Manage workspace
|
2
|
Click the Apply Editing  button on the Organizer toolbar. button on the Organizer toolbar. |
|
3
|
Click OK in the Batch Progress dialog box. |

When you close the program, all captured edits are automatically cleared.

You can also apply the captured edits by right-clicking the selected thumbnails and choosing Apply Editing.

You can also undo the editing to multiple photos by selecting the thumbnails of the edited photos, right-clicking a selected thumbnail, and choosing Revert All Editing from the context menu.
Copyright 2013 Corel Corporation. All rights reserved.
