You can remove unwanted portions of an image to create stronger compositions or to draw attention to another area of the image. Corel PaintShop Pro helps you crop by providing presets to common image sizes, such as 4 × 6 inches or 10 × 15 centimeters.
| To crop an image |
|
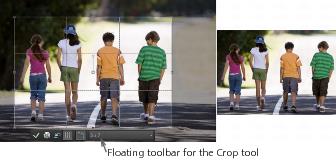
| 1 | On the Tools toolbar, choose the Crop tool |
| By default, the crop rectangle appears on the image, and the area outside the crop rectangle is shaded. |
| 2 | Adjust the crop area size by dragging any of the handles or edges. To reposition the crop rectangle, place the cursor inside and drag. |
| You can use a preset crop size by choosing an option from the Presets drop-list on the floating toolbar for the Crop tool, or from the drop-list on the Tool Options palette. |
| 3 | When you’re ready to crop the image, click the Apply button |
|
Specify the Pixel Dimensions values in the Width and Height controls or the Document size values in the Width, Height and Units controls.
|
|
|
Mark the Maintain aspect ratio check box on the Tool Options palette. This option is available only for custom-defined crop rectangles.
|
|
|
Click the Rotate Crop Rectangle button
|
|
|
Specify the degree of rotation in the Angle controls on the Tool Options palette.
|
|
|
Specify the X and Y coordinates under Pivot on the Tool Options palette or hold down Ctrl, and then drag the axis point of the rotation handle (the circular end of the handle) to a new position.
|
|
|
Click the Center Pivot button
|
|
|
Choose File
|
|
|
Choose File
|
|
|
Choose File
|
|
|
Choose File
|
|
|
Click the Clear button
|
| To crop an image for printing |
|
| 1 | On the Tools toolbar, choose the Crop tool |
| 2 | Define the crop area by dragging within the image. |
| 3 | On the Tool Options palette, mark the Specify Print Size check box. |
| Note: If the Specify Print Size check box is marked, the image resolution changes when you change the values in the Height and Width controls of either the Pixel Dimensions or the Document size. The current resolution appears to the right of the Units drop-list. |
| 4 | In the Units drop-list, select Inches or Centimeters. |
| Note: The Pixels option is unavailable for this method of cropping. |
| 5 | Type or set the dimension values in the Height and Width controls. |
| The final crop area is sized as specified, and the image resolution is reduced or increased as needed. |
| 6 | Click the Apply button |
| To crop to a selection in an image |
|
| 1 | Make a selection in the image. |
| 2 | Choose Image |
You can also crop to the selection by choosing the Crop tool ![]() and clicking Current Selection
and clicking Current Selection ![]() in the Snap crop rectangle to group box on the Tool Options palette. Adjust the crop area, and click Apply
in the Snap crop rectangle to group box on the Tool Options palette. Adjust the crop area, and click Apply ![]() .
.
| To crop to an opaque area in a layer or an image |
|
| 1 | Click the Crop tool |
| 2 | On the Tool Options palette, select one of these options from the Snap Crop Rectangle To group box: |
| • | Layer Opaque |
| • | Merged Opaque |
| 3 | Adjust the crop area. |
| 4 | Click the Apply button |
Opaque areas that are not rectangular may have transparent areas remaining after cropping.
| To create a new image by cropping |
|
| 1 | On the Tools toolbar, choose the Crop tool |
| 2 | Define the crop area by dragging within the image. |
| 3 | Click the Crop as new image button |
| A new image is created, but the cropped image remains unchanged, and remains the active image. |