| To zoom |
|
| 1 | On the Tools toolbar, choose the Zoom tool |
| 2 | Click to magnify the area, or right-click to reduce the area. |
| The magnification changes to a preset percentage that appears in the Zoom (%) control on the Tool Options palette. |
|
On the Tool Options palette, type a value in the Zoom (%) control.
|
|
By default, when you zoom in or out, the image window automatically resizes to fit the image.
You can also change the magnification when the Zoom tool is active by using the scroll-wheel if one is included on your mouse or stylus.
You can also change the magnification of an image by choosing View ![]() Zoom in and View
Zoom in and View ![]() Zoom out.
Zoom out.
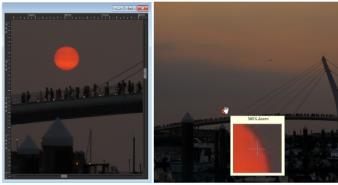
| To magnify an image area |
|
| 1 | Choose View |
| 2 | Position the cursor over the image area that you want to magnify. |
| The area under the cursor is displayed at 500%. |
To turn off the magnifier mode, choose View ![]() Magnifier again.
Magnifier again.
| To pan around an image |
|
| 1 | On the Tools toolbar, choose the Pan tool |
| 2 | Drag within the image. |
|
Hold down the Spacebar, and drag with the other tool.
|
|
| To fit the window to the image |
|
| • | Choose Window |
You can also fit the window to the image by clicking the Fit Window to Image button ![]() on the Tool Options palette when the Pan tool
on the Tool Options palette when the Pan tool ![]() or Zoom tool
or Zoom tool ![]() is active.
is active.