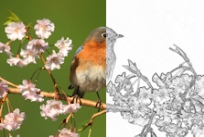
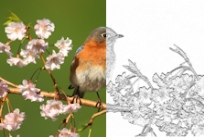
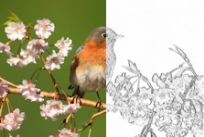
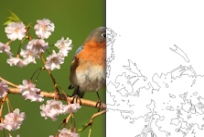
Edge effects are applied to the edges in an image or selection. You can dilate, enhance, erode, find, and trace the edges in an image to create interesting results.
Important! These effects work on grayscale and 16 million–color (24-bit) images only. For more information about increasing the color depth of an image, see Increasing the color depth of an image.
Edit workspace
The Dilate effect enhances the light areas of an image or selection. You can apply the Dilate effect by choosing Effects  Edge Effects
  Dilate.

Edit workspace
The Enhance effect increases the contrast along the edges in an image. You can apply the Enhance effect by choosing Effects  Edge Effects
  Enhance.

Edit workspace
The Enhance More effect applies a stronger contrast to the edges in an image than the Enhance effect does. You can apply the Enhance More effect by choosing Effects  Edge Effects
  Enhance More.

Edit workspace
The Erode effect enhances the dark areas in an image. You can apply the Erode effect box by choosing Effects  Edge Effects
  Erode.

Edit workspace
The Find All effect enhances the contrast between light and dark in an image by darkening the image and then highlighting the edges. You can apply the Find All Edges effect by choosing Effects  Edge Effects
  Find All.

Edit workspace
The Find Horizontal effect enhances the contrast between light and dark in an image by darkening the image and then highlighting the horizontal edges. You can apply the Find Horizontal edges by choosing Effects  Edge Effects
  Find Horizontal.

Edit workspace
The Find Vertical effect enhances the contrast between light and dark in an image by darkening the image and then highlighting the vertical edges. You can apply the Find Vertical edges effect by choosing Effects  Edge Effects
  Find Vertical.

Edit workspace
The High Pass effect emphasizes color transitions between highlight and shadow colors. You can use it with other imaging operations to create or enhance special effects such as embossing or line-drawing effects. The High Pass effect preserves the contrast of edges and areas of high detail while leaving the rest of the image a neutral gray. You can access the High Pass dialog box by choosing Effects  Edge Effects
  High Pass.

The High Pass dialog box contains the following controls:
| • |
Radius — sets the radius of the blur effect as a percentage |
| • |
Desaturate — removes all color, leaving a gray result. The results of the High Pass effect are close to monochrome, even when this check box is unmarked. You can mark this check box, however, to prevent subtle color shifts that can occur when sharpening is applied to an image. This option works by removing any color artifacts that remain after sharpening. |
Edit workspace
The Trace Contour effect traces a series of single-pixel lines around areas of contrast and turns the remaining pixels white. You can apply the Trace Contour effect by choosing Effects  Edge Effects
  Trace Contour.

Copyright 2014 Corel Corporation. All rights reserved.
![]() Edge Effects
Edge Effects ![]() Dilate.
Dilate.![]() Edge Effects
Edge Effects ![]() Enhance.
Enhance.![]() Edge Effects
Edge Effects ![]() Enhance More.
Enhance More.![]() Edge Effects
Edge Effects ![]() Erode.
Erode.![]() Edge Effects
Edge Effects ![]() Find All.
Find All.![]() Edge Effects
Edge Effects ![]() Find Horizontal.
Find Horizontal.![]() Edge Effects
Edge Effects ![]() Find Vertical.
Find Vertical.![]() Edge Effects
Edge Effects ![]() Trace Contour.
Trace Contour.