| • | To make a nozzle file from a movie |
| • | To make a 2-Rank nozzle from a movie |
The Make Nozzle From Movie command automatically creates a 1-Rank nozzle. If you want, you can use this technique to create a 2-Rank nozzle.
| To make a nozzle file from a movie |
|
| 1 . | Open the movie that you want to turn into a nozzle file. |
| 2 . | Choose Window |
| 3 . | In the Nozzles panel, click the Nozzle options button |
| An untitled image file appears containing each movie frame. |
| 4 . | If you didn’t create selections in a frame of the frame stack, you can create the selections now. |
| Remember, each image element must be included in the selection. |
| 5 . | Save the file in RIFF format. |
| You can now load and use this file as you would any 1-Rank nozzle file. |
| To make a 2-Rank nozzle from a movie |
|
| 1 . | Choose Movie |
| The frame size (canvas width and height) should be just large enough to hold your largest image element. |
| The total number of frames must equal the number of elements in Rank 1 multiplied by the number of elements in Rank 2. For example, for a 2-rank nozzle with three items in Rank 1 and three items in Rank 2, the movie needs to contain nine frames. |
| 2 . | Add an image element to the first frame. You can add image elements by using selections or layers. |
| 3 . | In the Layers panel, click the Layer options button |
| 4 . | Move to the second frame, and add an image element. Edit the image element if necessary, and repeat step 3 before moving to the next frame. |
| 5 . | Continue adding image elements to the remaining frames. Make sure to apply the Drop and Select command before moving to a new frame. |
The image elements in this movie are arranged in color sets according to the second rank.
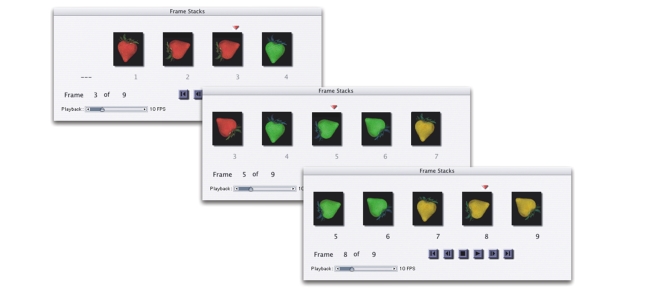
| 6 . | In the Frame Stacks panel, click the Rewind button |
| 7 . | Choose Window |
| 8 . | In the Nozzles panel, click the Nozzle options button |
| A new file appears. |
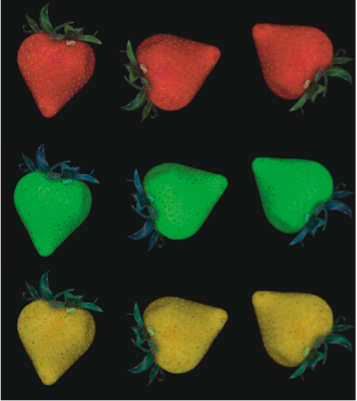
The resulting nozzle file from the movie in the previous example
| 9 . | From the menu bar, choose File |
| The File Information dialog box holds the information Corel Painter uses to index in this file. |
| 10 . | Edit the statement to describe the nozzle index you created. |
| For example, the statement "Image hose 9 items" describes a 1-Rank nozzle with nine image elements. To describe a 2-Rank nozzle with three items in Rank 1 and three items in Rank 2, you need to change the statement to "Image hose 3 by 3 items." |
| 11 . | Save the file. |
| To paint with the new nozzle file, you need to load it first. For more information, see To load a 2-Rank or 3-Rank nozzle file. |