Corel Painter Help :
Gradients : Creating and editing gradients
Quick links to procedures on this page:
Although Corel Painter comes with libraries full of gradients, you can create custom gradients or edit existing gradients.
You can create very simple to very complex gradients. For a simple two-point gradient, you choose a main and an additional color, and then Corel Painter generates the gradient colors between them.
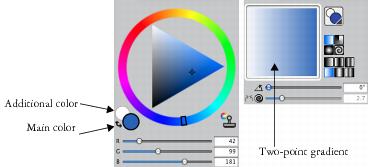
A two-point gradient (right) generated from the main and additional colors (left).
You can also create a new gradient by editing an existing gradient. For example, you can modify the gradient color blend or add additional colors to a gradient, which are also known as color control points.
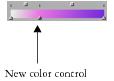
A new color was added to the gradient by adding a color control point to the color ramp bar.
In addition, you can modify the gradient hue to change the appearance of a particular gradation of color.
You can use any existing image as a source for creating new gradients. For example, you can capture the colors in a photo of a sunset, or paint your own range of colors as the content of a gradient.
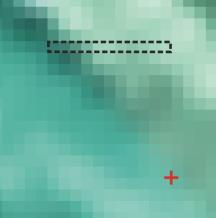
To create a perfect blend between a series of colors, it is better to work with a row of single pixels than a large piece of an image.
You can save all of your new and modified gradients in the Gradient Library so you can use them in future projects. For more information, see Working with libraries.
|
1
|
Choose Window  Color Panels Color. Color Panels Color. |
|
2
|
From the Color panel, click the Main Color (front) swatch  , and choose a main color. , and choose a main color. |
|
3
|
Click the Additional Color (back) swatch  , and choose an additional color. , and choose an additional color. |
|
4
|
Choose Window Media Control Panels Gradients. |
|
5
|
Choose Two-Point from the Gradient Selector. |
|
7
|
In the Save Gradient dialog box, type a name for the gradient in the Save as box. |
|
1
|
Choose Window Media Control Panels Gradients. |
|
2
|
Click the Gradient selector, and click a gradient from the Painter Gradients library panel. |
|
4
|
In the Edit Gradient dialog box, drag a color control point to modify the color transition. |

Drag a color control point to adjust the color transition at a specific point in the gradient.

To modify a two-point gradient, you can add additional color control points by clicking in the color ramp bar where you want to set the control points.
You can blend the gradient color ramp by disabling the Linear check box and dragging the Color Spread slider to control the color smoothness at each color control point.
|
1
|
Choose Window Color panels Color. |
|
2
|
Choose Window Media Control Panels Gradients. |
|
3
|
Click the Gradient selector, and click a gradient from the Painter Gradients library panel. |
|
5
|
In the Edit Gradient dialog box, click in the color ramp bar where you want to set the control point. |
|
7
|
In the Color panel, choose the color you want to add to the gradient. |
You can press Option + click (Mac OS) or Alt + click (Windows) in the color ramp bar to create a control point that is set to the current color.
You can delete a control point by clicking a control point and pressing Delete (Mac OS) or Backspace (Windows).
|
1
|
Choose Window Media Control Panels Gradients. |
|
2
|
Click the Gradient selector, and click a gradient from the Painter Gradients library panel. |
|
4
|
In the Edit Gradient dialog box, click a square box above the color ramp bar. |
The Color hue options allow you to change the hue of the blend within that segment.
|
• |
RGB — blends the red, green, and blue components of the two colors |
|
• |
Hue Clockwise — blends the endpoint colors by rotating around the color wheel clockwise |
|
• |
Hue Counterclockwise — blends the endpoint colors by rotating around the color wheel counterclockwise |

To understand this concept better, refer to the standard display of the Color panel (Hue Ring and Saturation/Value Triangle), and note the order of the colors on the Hue Ring. Notice that as you change parameters within the Edit Gradient dialog box, gradient previews are updated in the Gradients panel.
|
1
|
Click the Rectangular Selection tool  from the toolbox. from the toolbox. |
|
3
|
Choose Window Media Control Panels Gradients. |
|
4
|
In the Gradients panel, click the Gradient options button  , and choose Capture Gradient. , and choose Capture Gradient. |
|
5
|
In the Save Gradient dialog box, type a name for the gradient in the Save as box. |
After a gradient is captured, it can no longer be edited. To change a captured gradient, change the artwork from which it was captured, and then recapture the gradient.
Copyright 2014 Corel Corporation. All rights reserved.