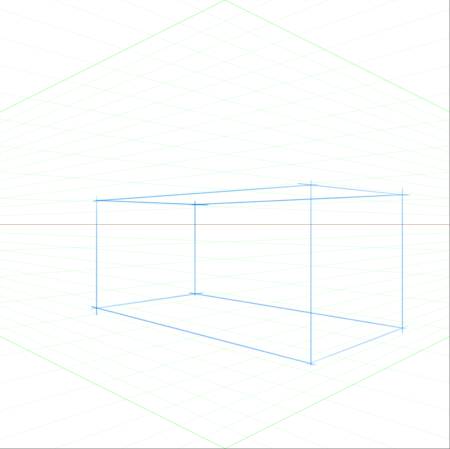
An example of painting a box by using Perspective Guides
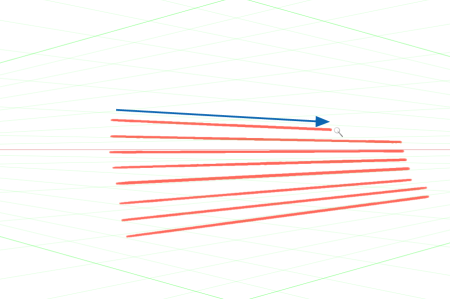
The Perspective-Guided Strokes are constrained to direct them towards the closest vanishing point.
| To show Perspective Guides |
|
| 1 | In the toolbox, click the Perspective Guides tool  . . |
| If you prefer, you can enable the Perspective Guides tool by pressing the keyboard shortcut. |
| 2 | Click the Enable Perspective Guides button  on the property bar. on the property bar. |
| 3 | On the property bar, click the Perspective Guide Presets button, and choose a preset from the list. |
To better display the guides, make sure you are in Full Screen mode. This allows you to reposition the guides to best suit your needs.
You can also show the Perspective Guides by choosing Canvas ![]() Perspective Guides
Perspective Guides ![]() Enable Perspective Guides. However, this option does not allow you to modify the Perspective Guides.
Enable Perspective Guides. However, this option does not allow you to modify the Perspective Guides.
| To show or hide Perspective Guides |
|
| 1 | In the toolbox, click the Perspective Guides tool . |
| 2 | Click the Enable Perspective Guides button on the property bar. |
| To enable perspective-guided strokes |
|
| 1 | In the toolbox, click the Perspective Guides tool . |
| 2 | Click the Perspective-Guided Strokes button  on the property bar. on the property bar. |
| To reposition lines and the vanishing point |
|
| 1 | In the toolbox, click the Perspective Guides tool . |
| 2 | Perform a task from the following table. |
|
Hold down Shift and drag the vanishing point to a new position.
|
|
|
Hold down Command + Shift (macOS) or Ctrl + Shift (Windows), and drag the vanishing point to a new position.
|
|
| To control the display of the primary lines |
|
| 1 | In the toolbox, click the Perspective Guides tool . |
| 2 | Perform a task from the following table. |
|
On the property bar, click the Show/Hide Primary Lines button
 . . |
|
|
On the property bar, click the color picker that is to the right of the Show/Hide Primary Lines button, and choose a color.
|
|
|
On the property bar, move the Primary Lines Opacity slider to adjust the line opacity.
|
| To control the display of the horizon line |
|
| 1 | In the toolbox, click the Perspective Guides tool . |
| 2 | Perform a task from the following table. |
|
On the property bar, click the Show/Hide Horizon Line button
 . . |
|
|
On the property bar, click the color picker that is to the right of the Show/Hide Horizon Line button, and choose a color.
|
|
|
On the property bar, move the Horizon Line Opacity slider to adjust the line opacity.
|
| To control the display of the intermediate lines |
|
| 1 | In the toolbox, click the Perspective Guides tool . |
| 2 | Perform a task from the following table. |
|
On the property bar, click the Show/Hide Intermediate Lines button
 . . |
|
|
On the property bar, click the color picker that is to the right of the Show/Hide Intermediate Lines button, and choose a color.
|
|
|
On the property bar, move the Intermediate Lines Opacity slider to adjust the line opacity.
|
|
|
On the property bar, move the Intermediate Lines Density slider to adjust the line density.
|
| To reset the perspective guides |
|
| 1 | In the toolbox, click the Perspective Guides tool . |
| 2 | Click the Reset Tool button  on the property bar. on the property bar. |
| To save perspective guide settings as a preset |
|
| 1 | In the toolbox, click the Perspective Guides tool . |
| 2 | Click the Enable Perspective Guides button on the property bar. |
| 3 | Click the Perspective Guide Presets button on the property bar, and then choose Add from the list. |
| 4 | In the Add Preset dialog box, type a name for your preset in the Preset Name box. |
| 5 | Click Save. |
| The preset appears in the presets list. |
| To delete a perspective guide preset |
|
| 1 | In the toolbox, click the Perspective Guides tool . |
| 2 | With perspective guides enabled, click the Perspective Guide Presets button on the property bar, and then choose Delete from the list. |
| 3 | Choose a preset from the Preset Name list box. |
| 4 | Click Yes. |
Copyright 2017 Corel Corporation. All rights reserved.