Applying Glass Distortion
The Glass Distortion effect creates the kind of distortions you would see if you were looking at your image through a sheet of glass. You can make your image appear as if it is behind the pebble glass of a shower door, or you can distort your image beyond recognition.
Glass Distortion works by relocating the pixels of the image based on a displacement map. The map is created by combining displacement information from a source with a preset map type.
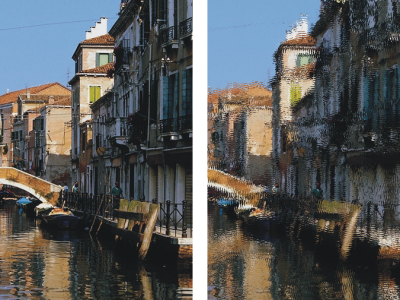
Before (left) and after (right) applying Glass Distortion
There are five sources of displacement information:
• Paper uses the information in a paper texture to displace pixels. More displacement is applied to light areas of the texture, and less to dark areas. Paper texture is good for creating the pebbled glass effect. Unless you want frosted glass, you’ll probably want to increase the scale of the paper.
• 3D Brushstrokes uses the difference in luminance between the brushstrokes applied to the clone and the current document
• Image Luminance uses the light and dark areas in the current document to determine the intensity of distortions
• Original Luminance uses the clone source’s luminance. Use a tessellation as the clone source to produce a bumpy glass effect.
• [Alpha channel] or [Layer mask] uses the luminance of a channel or layer mask. More distortion appears in the light areas of the channel. You must have a saved alpha channel or layer mask to use this source.
To create a controlled distortion map, choose an alpha channel or a layer mask as a source. For example, gradations in the channel lead to a progressive distortion effect. Shapes in the channel produce distortions with distinct outlines.
To apply glass distortion by using paper luminance
• A selection — Click a selection tool from the toolbox, and drag in the document window to select an area.
To apply glass distortion by using 3D brushstrokes
• A selection — Click a selection tool from the toolbox, and drag in the document window to select an area.
To apply glass distortion by using image luminance
• A selection — Click a selection tool from the toolbox, and drag in the document window to select an area.
To apply glass distortion by using clone or pattern luminance
• A selection — Click a selection tool from the toolbox, and drag in the document window to select an area.
To apply glass distortion by using layer mask or channel luminance
• To use a layer mask, choose Window  Layers, and click the layer that contains a layer mask in the Layers panel.
• To use an alpha channel, choose Window Channels, and click the alpha channel in the Channels panel.
• A selection — Click a selection tool from the toolbox, and drag in the document window to select an area.
Glass Distortion controls
Increasing the Softness setting creates more intermediate steps, which produces a smoother distortion. If you experience aliasing in a glass distortion, try increasing the Softness setting.
• Refraction (Map type) — displaces pixels in the same way that an optical lens bends light. This is the best map type for creating distortions that you’d expect from looking through glass.
• Angle Displacement (Map type) — moves pixels in different directions. Increasing the Softness value by a small amount (from 0 to 0.1) with this map type produces dramatic changes in the glass distortion.
• Amount — controls the degree of displacement. Moving the slider to the right increases the distortion.
• Variance — creates multiple variations in the neighborhood of the displacement. The result of increasing variance depends on the type of image and other settings.