Applying textures as fills
Corel Painter lets you apply texture fills to images.
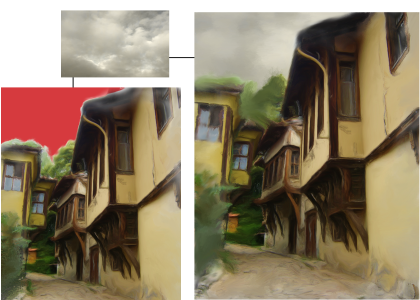
An example of a selection filled with a texture
To apply a texture as a fill

1
Create or open a document.
2
Perform a task from the following table.
|
|
|
|
|
Select the canvas in the Layers panel. |
|
|
Select a layer in the Layers panel. |
|
|
Choose a selection brush from the Brush Selector Panel ( Window  Brush Selector Panel (Full View) Brush Selector Panel (Full View)) or a selection tool from the toolbox. Drag in the document window to select the area of the image that you want to fill. |
3
Click the
Paint Bucket tool

in the toolbox.
4
On the property bar, click the
Fill Image button

.
5
From the
Fill list box on the property bar, choose
Texture.
6
Click the
Fill selector on the property bar, and click a texture.
7
In the document window, click the canvas, selection, or layer.
|
|
|
Specify the range of colors to be filled |
On the property bar, type a value in the Tolerance box or move the slider. |
Specify the texture opacity for pixels outside the tolerance range |
On the property bar, type a value in the Feather box or move the slider. |
Soften the edges of the texture |
On the property bar, click the Anti-Alias button  . Anti-aliasing is desirable when the Feather setting is extremely low or set to zero. |

You can also choose a texture by clicking Edit Fill. In the Fill dialog box, choose Texture from the Fill with list box, and click the Fill selector. Move the Opacity slider to adjust the texture opacity, and click OK. Texture transparency is maintained.