Applying the Bevel World dynamic plug-in
The Bevel World dynamic plug-in lets you create three-dimensional (3D) objects by adding bevel effects, or angled edges, to selections or layers. You can control both bevel shape and lighting to create unique effects.
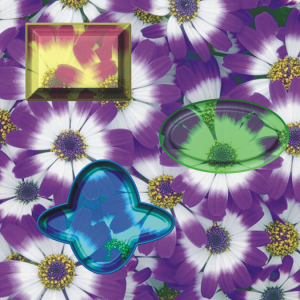
Examples of various bevel profiles
For example, you can even use Bevel World to create a 3D button with text on it. First, create the background button, and then add text to float over the button. You can then group the text and button together and collapse the layer group.
You can also change the 3D appearance of the bevel by adjusting the lighting.
To apply a bevel effect

1
Do one of the following:
•
In the
Layers panel, choose a layer.
•
Choose a selection tool

from the toolbox, and then drag in the document window to select an area.
2
In the
Layers panel, click the
Dynamic Plug-ins button

, and choose
Bevel World.
3
In the
Bevel area, adjust any of the following sliders:
•
Bevel Width — specifies the width of the bevel in relation to the layer diameter
•
Outside Portion — controls the portion of the bevel that appears outside the layer
•
Rim Slope — specifies the angle of the rim (innermost portion) of the bevel
•
Cliff Portion — specifies the horizontal distance between the base and the rim
•
Cliff Height — specifies the vertical distance between the base level and rim level
•
Cliff Slope — specifies the angle of the cliff (middle portion) of the bevel
•
Base Slope — specifies the angle of the base (outermost portion) of the bevel
•
Smoothing — controls the roundness of the transitions between base, cliff, and rim as well as the sharpness of the resulting ridges
4
In the
Light area, adjust any of the following sliders:
•
Light Direction — specifies the angle of the light source
•
Light Height — specifies the light’s angle in relation to the canvas. At 90°, the light is shining straight down, and at 1°, it’s nearly horizontal. With
Light Height set to 90%, the
Light Direction setting has no effect. When set to 90% or less, the light rotates around the center.
•
Brightness — controls the light’s intensity
•
Scatter — adjusts the spread of the light’s shine over the surface
•
Shine — controls the prevalence of highlights
•
Reflection — controls how much of the source image is visible in the bevel. If you are working with a clone, the clone source is mapped onto the surface at a variable percentage.
|
|
|
Add beveling on the interior edges of the bevel area |
Enable the Bevel inner edges check box. |
Change the color of the outside portion |
Click the Outside Color chip, and choose a color from the color picker. This control applies only when Outside Portion is greater than zero. |
|
|
Click the Light Color chip, and choose a color from the color picker |
Add a preset light source |
In the Light area, enable the Simple lighting check box, and click a light indicator on the lighting sphere. |
Add a custom light source |
In the Light area, disable the Simple lighting check box, and click on the lighting sphere where you want to add a new light source. A new light indicator (small circle) appears where you click. |
Delete a custom light source |
Click on a light indicator and press Delete. |
Restore the default settings |
|

You can use the Revert to Original command in the Layers panel menu to restore a source image to its original condition. For more information, see Modifying and deleting dynamic layers.