Blending controls
The Blending controls determine how a brush conveys its medium (color) to the paper. You can choose from several preset to suit your needs.
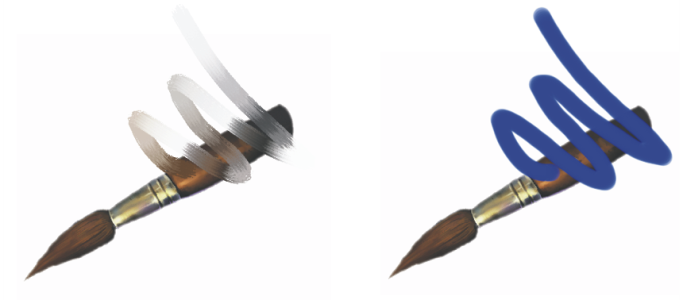
Whether you are painting with a single color or blending two or more colors on a layer, the Enhanced Layer Blending option can help you produce brushstrokes without white fringes. This option uses improved transparency support.

Brushstrokes without (left) and with Enhanced Layer Blending (right)
The Bleed, Resaturation, and Dryout controls work together to determine how much color a brush has at the start and finish of a stroke.
Resaturation lets you control the amount of color that is replenished in a stroke. If it is set at zero, the brush does not produce any color. When Resaturation is less than 10% (and Bleed is less), a brushstroke fades in gently. When the Resaturation slider is set at zero and Bleed is set high, an airbrush can move underlying colors, as when just the airbrush hose is used to blow paint around on the canvas.
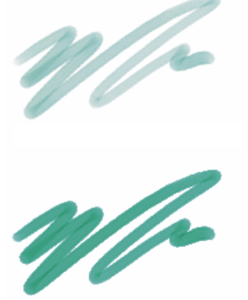
Brushstrokes with Resaturation set to 25% (top) and 100% (bottom)
Bleed lets you control how much the brush colors smear underlying colors, including the canvas color. When Bleed is higher than resaturation, more color bleeds than covers, so the stroke never reaches full opacity.
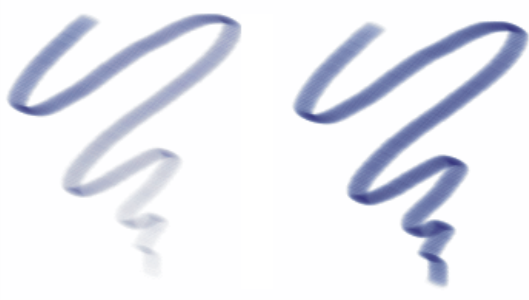
Brushstrokes with Bleed set to 55% (left) and 1% (right)
You can also apply an Expression setting to the Resat and Bleed controls to link them to a stylus or mouse movement. You can choose different Expression settings for each. For example, you can link Resat to the Pressure expression and link Bleed to the Velocity expression.
You can also adjust the Min setting to specify the range of variability that you want each expression to apply. The Min Resat and Min Bleed settings represent a percentage of the Resat and Bleed settings and they must be linked to an expression to have an effect. For example, if you link the Pressure expression to the Resat control, set the Resat slider to 40% and set the Min Resat slider to 50%, the amount of resaturation will vary from 20% to 40% every time you apply pressure with the stylus.
Brush Loading affects how stamp-based brushes interact with underlying pixels and works in conjunction with Resat and Bleed. When Brush Loading is active, brushes can pick up existing colors, hair by hair. This capability offers truer color interaction, astounding color-variations, smearing, and better cloning results. For more information about stamp-based brushes, see General controls: Dab types.
When Brush Loading is not active, brushes interact with previously applied colors by sampling underlying pixels and then loading the brush with one new color — the average of the colors that were sampled. When you use Brush Loading, it’s best to use a very low setting for spacing. For more information, see Spacing controls.
The Dryout control determines how quickly a brush runs out of medium. Dryout is measured in pixels. Moving the slider to the left causes a brush’s reservoir to empty more quickly. This can produce brushstrokes that fade out gently. If Dryout is set high, the brush never runs out of color.
Dryout works in conjunction with Bleed, so Bleed must be set above zero if you want to take advantage of Dryout. You can modulate the Dryout effect by changing the Bleed setting.
Brushstrokes with Dryout set to 724 (left) and 22026 (right)
You can set some blending options on the property bar. For more information, see To choose a dab profile using the property bar.
For a list of sample brushstrokes that use blending, see Blenders.