Creating a 2-Rank nozzle
If you want to create a 2-Rank nozzle, such as a nozzle with a two-dimensional progression, you need to set up the nozzle images accordingly. Unlike 1-Rank nozzles, nozzles of two and three ranks cannot be created from a layer group. You must build these nozzles manually. The indexing system requires the nozzle images to fit in a grid. You can create a nozzle file by setting up a grid and placing an image element at the center of each cell.
The cell size is based on the smallest rectangle that will hold the largest image element (including its selection). To make sure that your images fit in the grid, copy your largest image element to a layer. After you have set up the nozzle images in the grid, you can build your nozzle. For more information, see Creating and deleting layers.
To determine the grid cell size and nozzle dimensions

1
In the toolbox, click the
Layer Adjuster tool

, enable the
Auto-Select Layer check box on the property bar, and in the document window click the layer with the largest image element that you want to include in the nozzle.
Corel Painter displays the pixel width and height of the layer’s content in the
Navigator panel. To display the
Navigator panel, choose
Window  Navigator
.
You might want to use slightly larger values for the grid cell size.
Determine the number of elements that you want in each rank.
2
Multiply the number of items in
Rank-1 by the cell width.
This value is the nozzle’s width.
3
Multiply the number of items in
Rank-2 by the cell height.
This value is the nozzle’s height.
To create the grid
1
From the menu bar, choose
File New, and enter the nozzle’s width and height in the
Width and
Height boxes.
2
From the menu bar, choose
Canvas Virtual Grid Virtual Grid Options.
3
In the
Grid Options dialog box, set the
Horizontal spacing and
Vertical spacing to the values of the cell width and height, and click
OK.
4
Show the grid by choosing
Canvas Virtual Grid Show Virtual Grid.
The grid should describe the number of elements you want in each rank —
Rank 1 horizontally and
Rank 2 vertically.
To build a 2-Rank nozzle
1
Place one image element in the center of each grid cell.
Follow an appropriate progression based on your intentions for controlling this nozzle.
The easiest way to do this is with layers. When you bring image elements into the grid as layers, they bring their layer masks with them. If the image elements are layers in different files, it is easier to open the files one at a time.
2
From the menu bar, choose
Window Layers.
3
In the
Layers panel, select all layers.
4
Click the Layer options button

, and choose
Drop and Select.
5
From the menu bar, choose
File Save As, and save the file in RIFF format.
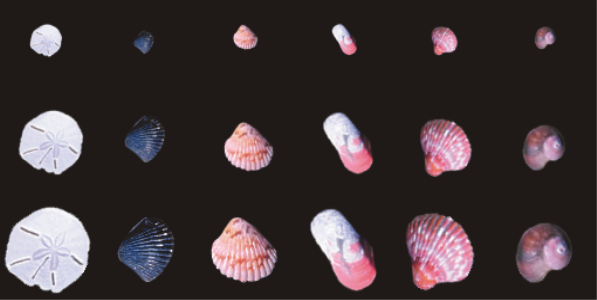
In this finished 2-Rank nozzle, variety is the first rank, and size is the second rank.

To paint with your new nozzle file, you’ll need to load it first. For more information, see To load a 1-Rank nozzle file.