Editing gradients
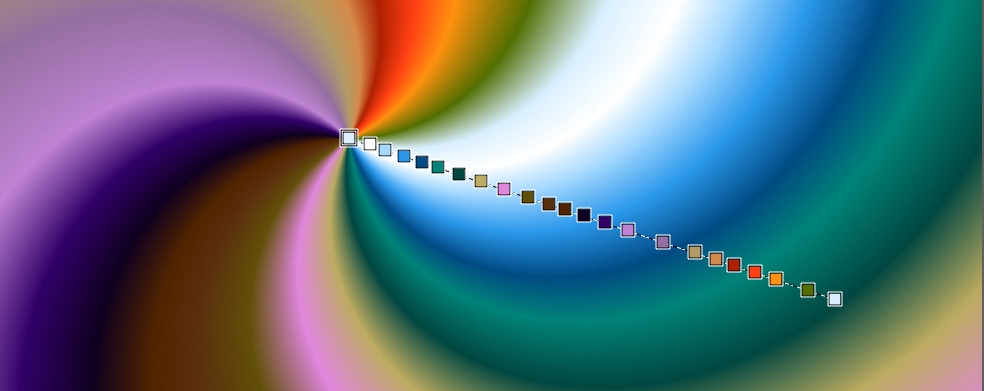
After you draw a gradient with the Interactive Gradient tool, you can edit it in the document window. An interactive gradient control appears, which marks the transition from one color to another. The direction and size of the gradient depend on where you first click in the document window, the distance that you drag, and the direction in which you drag. Each color in the gradient fill is represented by a square node on the interactive gradient control. You can modify the gradient appearance by repositioning nodes, adding and removing nodes, and changing the color of nodes.
Change a color, add a new color, or adjust the position and direction of a gradient by editing nodes interactively.
You can edit gradient attributes such as the gradient size, the direction of a gradient’s color blend, the gradient colors, and the gradient’s angle.
You can also edit existing gradient presets or custom gradients before you apply them or save them for future use.
To edit a gradient interactively

1
Click the
Interactive Gradient tool

in the toolbox.
2
Click the
Preset flyout button

on the property bar, and click a gradient fill thumbnail.
Make sure the
Edit nodes option on the property bar is enabled.
4
Perform a task from the following table.
|
|
|
Adjust the size of a gradient |
Drag the start or end node on the interactive gradient control. |
Adjust the position of a gradient |
To set where you want the gradient to start, drag the start handle. To set where you want the gradient to end, drag the end handle. Tip: To snap the gradient line to the horizontal, vertical, or diagonal axis, hold down Shift key while you drag. |
Change the direction of a gradient fill |
Drag the end node in the opposite direction. Tip: You can also reverse the order of colors in the gradient by clicking the Reverse Gradient Direction button  on the property bar. |
Adjust the angle of a gradient |
|
|
|
Click a node, click the Color chip, and choose a color in the color picker. Tip: You can also change the color by clicking a node, clicking the Gradient Node panel toggle button  on the property bar, clicking the Color Selector in the Gradient Node panel, and choosing a color. |
|
|
Click anywhere along the interactive gradient control, click the Color chip, and choose a color in the color picker. Tip: You can also add a color by clicking anywhere along the interactive gradient control, clicking the Gradient Node panel toggle button on the property bar, clicking the Color Selector in the Gradient Node panel, and choosing a color. |
|
|
Click a node. Click the Gradient Node panel toggle button on the property bar. In the Gradient Node panel, click Delete Node. Note: You cannot delete an end node. |
Set the transparency of a color |
Click a node. Click the Gradient Node panel toggle button on the property bar. In the Gradient Node panel, move the Opacity slider or enter a value in the box. |
Specify the position of an intermediate node relative to the first and the last nodes |
Click a node. Click the Gradient Node panel toggle button on the property bar. In the Gradient Node panel, move the Position slider or enter a value in the box. |
To edit a gradient preset
1
In the
Gradient Libraries panel (
Window  Media Panels Gradients
), choose a preset.
2
Click the
Edit Gradient 
button.
3
In the
Edit Gradient dialog box, perform a task from the following table.
|
|
|
|
|
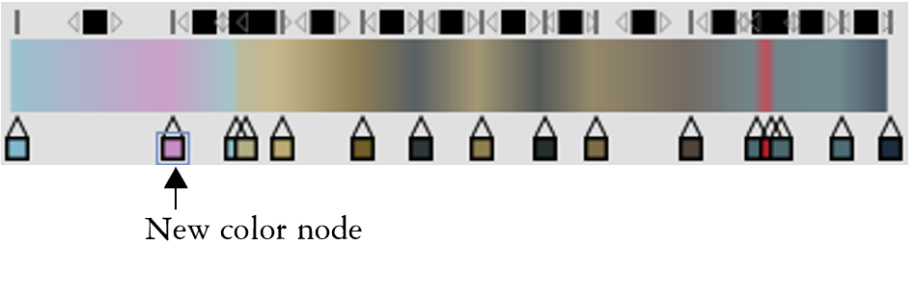
Click in the color ramp bar where you want to add a color, click the Color chip, and choose a color in the color picker. A new color was added to the gradient by adding a node to the color ramp bar.
|
|
|
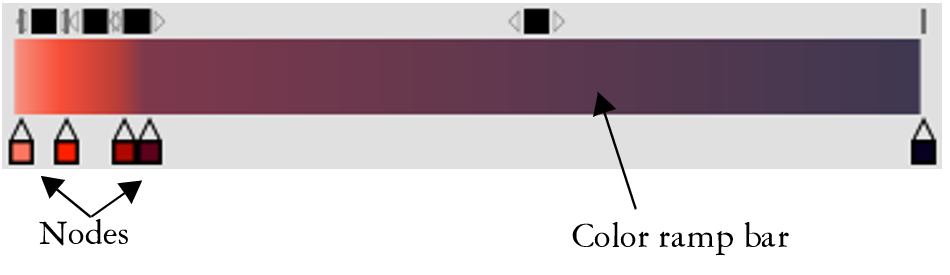
Click a node in the color ramp bar, and click Delete Node. |
Modify the color transition |
Drag a node in the color ramp bar. |
Set the transparency of a color |
Click a node in the color ramp bar and move the Opacity slider. |
Blend the gradient colors |
Disable the Linear check box and drag the Color Spread slider to control the color smoothness at each node. |
Specify how colors blend between two nodes |
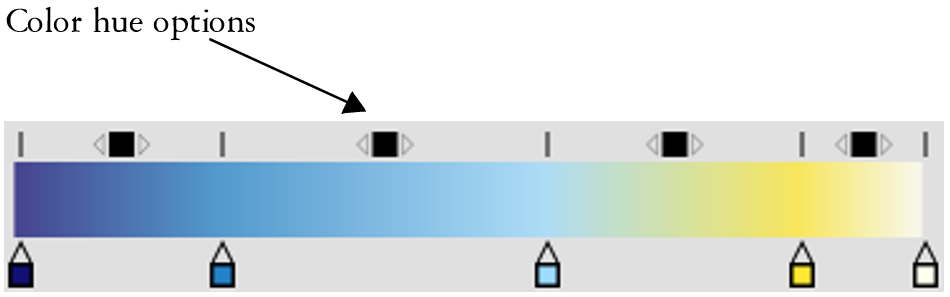
Click a square box above the color ramp bar. The Color hue options allow you to change the hue of the blend within that segment.
Select one of the following options in the Color Blend Method area: • RGB — blends the red, green, and blue components of the two colors • Clockwise around the color wheel — blends the end node colors along a clockwise path around the color wheel • Counterclockwise around the color wheel — blends the end node colors along a counterclockwise path around the color wheel Tip: To understand this concept better, refer to the standard display of the Color panel ( Hue Ring and Saturation/Value Triangle), and note the order of the colors on the Hue Ring. |
Create a node that is set to the current color |
Press Option + click (macOS) or Alt + click (Windows) in the color ramp bar. |
4
In the
Gradients panel (
Window Media Panels Gradients), click the Gradient options button

, and choose
Save Gradient.
5
In the
Save Gradient dialog box, enter a name for the gradient.
You can also
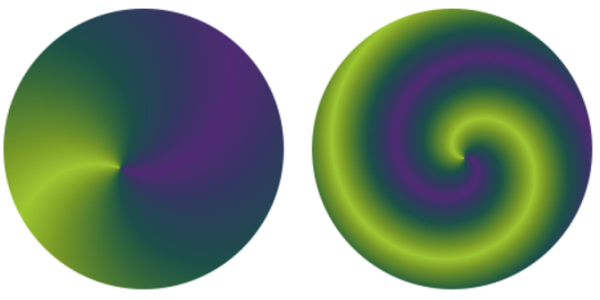
Modify the appearance of a spiral gradient |
Click the Preset flyout button on the property bar, and click Gradients Panel  to display the Gradients panel. Click the Spiral Gradient  button in the Type area, and do any of the following: • Drag the Spiral Rate slider to the right or left to increase or decrease the spiral tension. • Enable the Invert Spiral check box. A gradient with low spiral tension (left) and high spiral tension (right)
|
Adjust the angle of a gradient |
Drag the Ramp Angle slider or type an angle in the corresponding numeric value box. |