A short tour of Corel Painter for users of Adobe Photoshop
Corel Painter is known for its responsive, realistic brushes, multitude of rich textures, and fabulous special effects, which cannot be found in any other program. The biggest difference that you will notice between Adobe Photoshop and Corel Painter is the warmth and texture of the Natural-Media brushes and paper textures of Corel Painter. You’ll find brushes with realistic bristles that lay down oily paint and dry-media brushes, such as variants in the Chalk and Pastels categories, that are sensitive to textures on the canvas. Now, let’s get started!
Before we begin the tour, you need to make sure that you are displaying the default panels and palettes. To display the default settings, choose the Window menu, and choose Layout ![]() Default.
Default.
At the very top of the screen, you’ll see the property bar, which is similar to the Options bar in Photoshop. The property bar changes contextually, depending on the tool that you choose from the toolbox.
The property bar with the Grabber tool selected from the toolbox
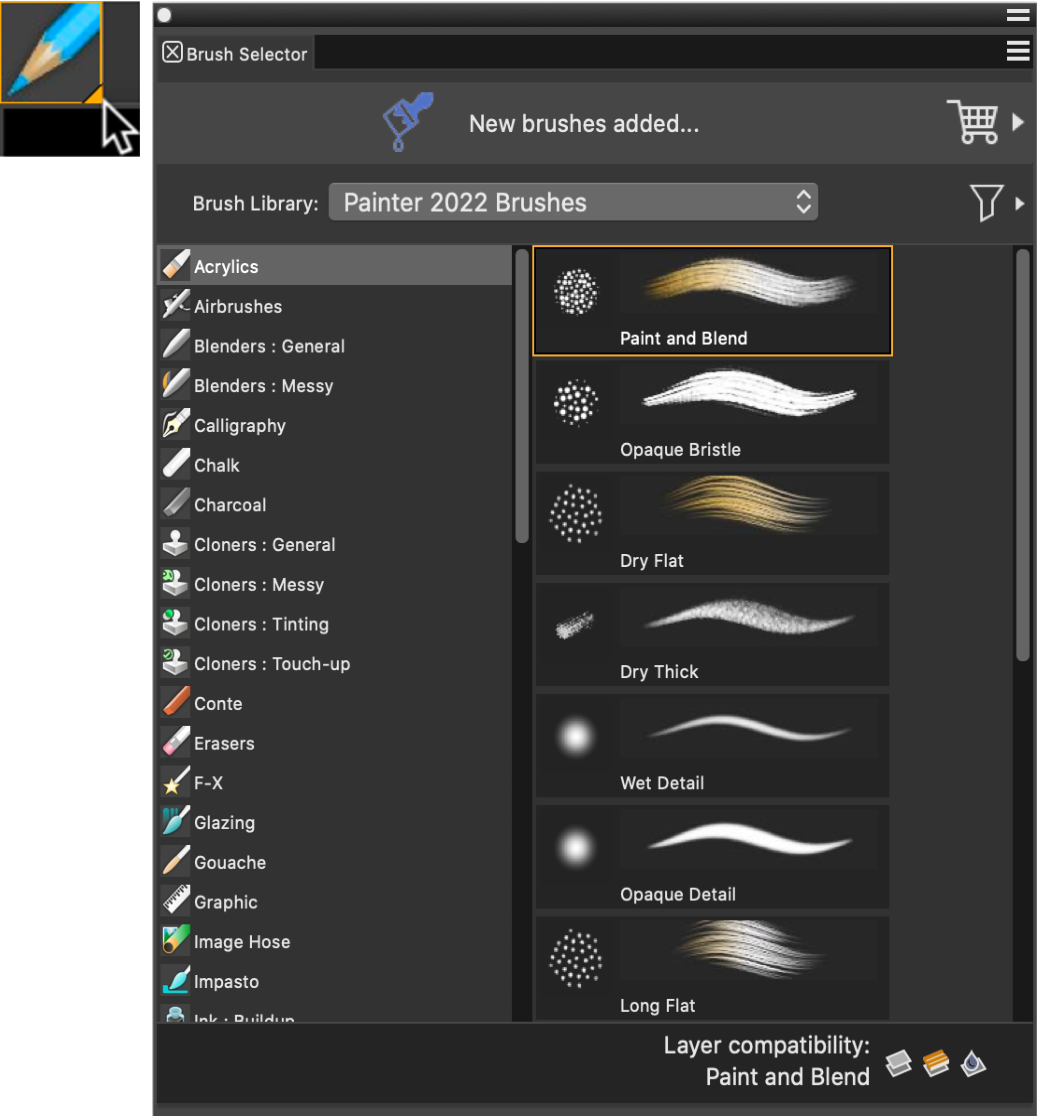
On the far left of the property bar is the Brush Selector bar, which lets you open the Brush Selector flyout. The Brush Selector contains the amazing brush categories and brush variants of Corel Painter, such as the Real watercolor brush category and its variants.
The Brush Selector bar (left) lets you choose a brush category and a brush variant (right).
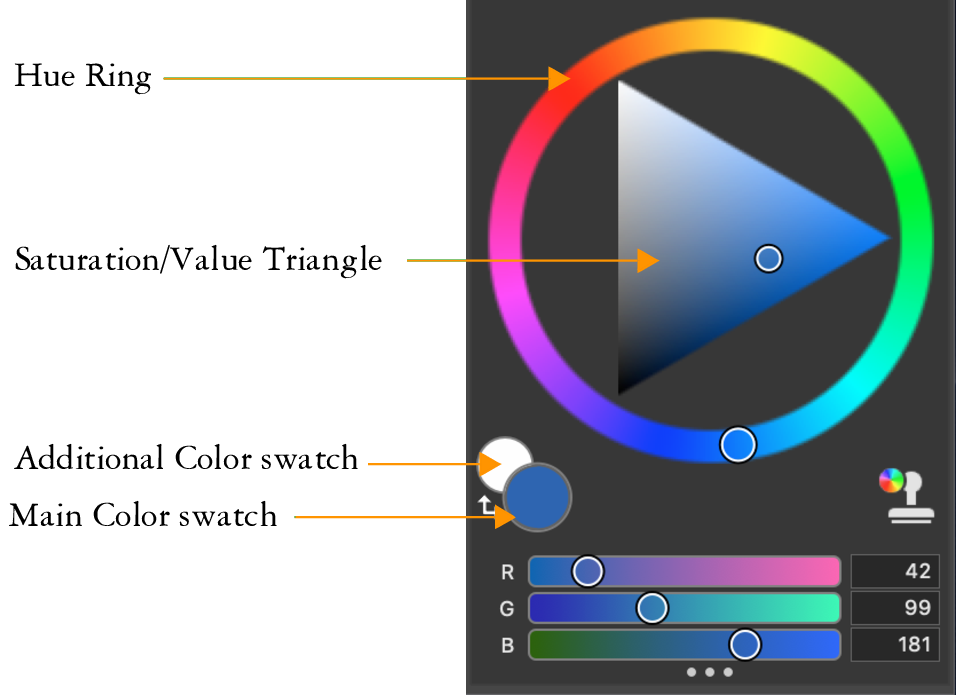
On the upper right corner of your screen you’ll see the large, beautiful Color panel, which lets you choose colors. You can choose colors by using the Hue Ring and the Saturation/Value Triangle. However, if you prefer to mix color by using numbers, you can adjust the three sliders that are located under the Hue Ring. By clicking the panel options button on the right side of the Color panel, you can set the sliders to display either Red, Green, and Blue, or Hue, Saturation, and Value.
Also located on the Color panel is the Clone Color button, a useful control that lets you paint with color from a source image. On the left of the Color panel are the Main Color swatch ![]() or Additional Color swatch
or Additional Color swatch ![]() . The color swatches in Corel Painter operate differently than the Foreground and Background Color squares in Photoshop. To change the color, you can double-click either the Main Color swatch or the Additional Color swatch and then choose a new color on the Hue Ring. Or you can click in the Saturation/Value Triangle to choose a new tint or shade. You can use the additional color to create gradients or to use brushes that paint more than one color. Unlike the Background Color in Photoshop, the additional color does not affect the canvas.
. The color swatches in Corel Painter operate differently than the Foreground and Background Color squares in Photoshop. To change the color, you can double-click either the Main Color swatch or the Additional Color swatch and then choose a new color on the Hue Ring. Or you can click in the Saturation/Value Triangle to choose a new tint or shade. You can use the additional color to create gradients or to use brushes that paint more than one color. Unlike the Background Color in Photoshop, the additional color does not affect the canvas.
Before moving on with the tour, click the Main Color swatch to select it.
In Corel Painter, you can resize the Color panel by dragging the handle in the lower-right corner of the panel to resize it. Resizing the Color panel lets you select colors more accurately.
A basic paper texture is automatically loaded when you start Corel Painter. You can access additional rich paper textures by clicking the Paper Selector flyout button ![]() on the property bar or opening the Papers panel (Window menu
on the property bar or opening the Papers panel (Window menu ![]() Media Panels
Media Panels ![]() Papers).
Papers).
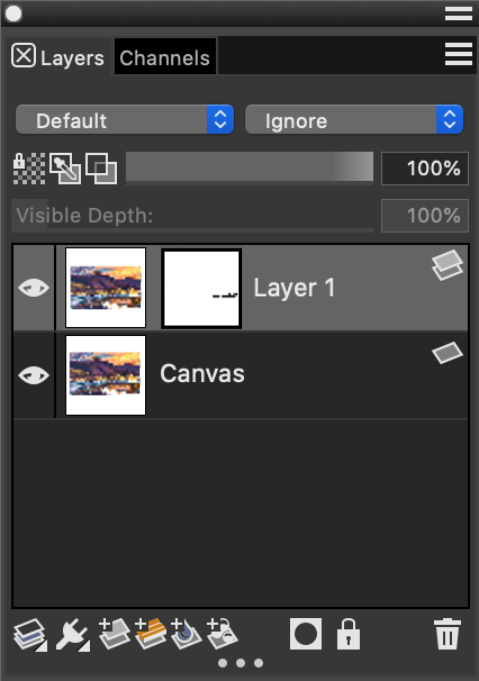
In Corel Painter, you can open Photoshop files that contain pixel-based layers and layer masks. You can access and edit the layers and layer masks by using the Layers panel, much like in Photoshop. The files you open in Corel Painter have multiple channels intact.
If you are using native Photoshop layer styles, such as the Drop Shadow layer style, make sure that you preserve the original Photoshop file in your archive before you convert the layer style information. That is, save the file with the live layer styles in the Photoshop (PSD) file format, and then save a new copy of this file. In the new file, convert the layer style information into pixel-based layers before importing the file into Corel Painter.
To convert a layer that has a Drop Shadow layer style, select the layer, and then choose Layers ![]() Layers Style
Layers Style ![]() Create Layer. A word of caution: Some aspects of the effects cannot be reproduced with standard layers.
Create Layer. A word of caution: Some aspects of the effects cannot be reproduced with standard layers.
Corel Painter gives you the flexibility of opening Photoshop (PSD) files that are saved in RGB, CMYK, and grayscale modes while preserving pixel-based layers and mask channels (also referred to as alpha channels). You can also open TIFF files in Corel Painter, but only one mask channel is preserved. Layered TIFF (TIF) files that you create in Photoshop are flattened when you open them in Corel Painter. When you work exclusively with RIFF (RIF), which is the native file format for Corel Painter, you retain Corel Painter specific elements when saving files. For instance, special paint media layers, such as Watercolor layers, require the RIFF format to retain the live "wet" capabilities. However, if you open a Photoshop file in Corel Painter but plan on reopening the file in Photoshop, you should continue to save the file to the Photoshop format.
Now roll up your sleeves, grab your stylus, and continue to explore Corel Painter.
An award-winning artist and author, Cher Threinen-Pendarvis is a pioneer in digital art. She has been widely recognized for her mastery of Corel Painter, Adobe Photoshop, and the Wacom pressure-sensitive tablet and has used these electronic tools since they were first released. Her artwork has been exhibited worldwide, her articles and art have been published in many books and periodicals, and she is a member of the San Diego Museum of Art Artist Guild. She has taught Corel Painter and Adobe Photoshop workshops around the world and is the principal of the consulting firm Cher Threinen Design. Cher is the author of The Photoshop and Painter Artist Tablet Book, Creative Techniques in Digital Painting, Beyond Digital Photography, and all ten editions of The Painter Wow! book. Visit Cher's web site at: www.pendarvis-studios.com.


