Cloning image areas
You can sample an area of an image and reuse it in the same document or in a different document. Sampling (also referred to as "offset sampling" or "point-to-point cloning") is a useful technique for retouching photographs. For example, you can copy pixels from one image area to another in order to cover damaged or unwanted elements in an image. You can also clone image elements you like and apply them to another image area or a second image.
To clone an image area, you must set a sampling reference point and then set destination reference points. Sampling reference points specify the area of the document that you want to reuse, or clone. Destination reference points determine the area where you want the sampled image to appear. To identify which area of the source document you are sampling, a crosshair cursor appears.
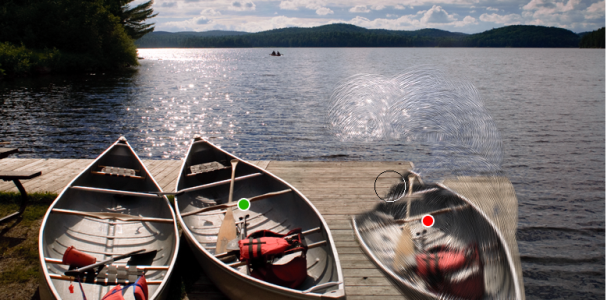
The green dot (left) represents the sampling reference point. The red dot (right) represents the destination point.
It is important to note that the sampling reference point, also known as the source, is not treated as a clone source. The sampled area does not appear in the Clone Source panel.
To perform offset sampling in a document

1
Click the
Rubber Stamp tool

in the toolbox.
If you want to adjust the size of the sampled area, type a value in the
Size box, or adjust the slider on the property bar.
2
Hold down
Option (macOS) or
Alt (Windows), and click to set the source reference point.
A green marker appears on the image to indicate the reference point for the source image.
3
Hold down
Option +
Shift (macOS) or
Alt +
Shift (Windows), and click to set the destination reference point.
A red marker appears on the image to indicate the destination point.
4
Apply brushstrokes to the destination area to reveal the sampled area.
You can disable offset sampling by clicking the
Clone Color button

in the
Color panel or by choosing a non-Cloner brush variant in the Brush Selector.
|
|
|
Adjust the clone color opacity |
On the property bar, type a percentage in the Opacity box, or move the slider. |
Adjust the randomized jitter of the brushstroke |
On the property bar, type a value in the Stroke Jitter box, or move the slider. |

You can also enable offset sampling by clicking the Cloner tool  in the toolbox.
You can set the destination area before painting by clicking while holding down Option + Shift (macOS) or Alt + Shift (Windows). A red marker indicates the destination area.
To perform offset sampling between documents
1
Open both the image that you want to use as a sampling source and the image that you want to use as a destination.
If you want to view both images at once, you may want to arrange them side by side.
2
With the source image selected, click the
Cloner tool
in the toolbox.
If you want to change the brush variant, click the Brush Selector, and choose a different Cloners brush category and variant.
3
Hold down
Option (macOS) or
Alt (Windows), and click the source document to set the sample source area reference point.
A green numbered marker appears on the image to indicate the reference point for the source area.
4
Hold down
Option +
Shift (macOS) or
Alt +
Shift (Windows), and click the destination document to set the destination reference point.
5
In the destination document, apply brushstrokes to the canvas.
You can disable offset sampling by clicking the
Clone Color button
in the
Color panel or by choosing a non-Cloner brush variant in the Brush Selector.
|
|
|
Adjust the size of the brushstroke |
Type a value in the Size box, or move the slider on the property bar. |
Adjust the clone color opacity |
On the property bar, type a percentage in the Opacity box, or move the slider. |
Control the amount of color that is replenished in a stroke |
On the property bar, type a percentage in the Resat box, or move the slider. |
Control how much the brush colors smear underlying colors, including the canvas color |
On the property bar, type a percentage in the Bleed box, or move the slider. |
Adjust bristle separation |
On the property bar, type a value in the Feature box, or move the slider. The higher the setting, the farther apart the bristle hairs will appear. |
Scale the brushstroke proportionally with the brush size |
Click the Scale Feature With Brush Size button  on the property bar. |