Using perspective guides
You can display non-printing perspective guides to paint objects that give the impression that they are receding, or vanishing, from view.
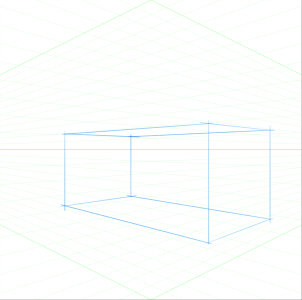
An example of painting a box by using perspective guides
Corel Painter provides a selection of presets, which include different configurations of the perspective guides. The presets have one, two, or three vanishing points that help set the direction of the perspective. You can modify a preset and save it. You can also delete presets and restore the default settings of presets.
You can display the perspective guides simply as a visual aid, or you can choose to paint in perspective mode. In this mode, Corel Painter aligns the brushstrokes you apply in the document window to the vanishing points.
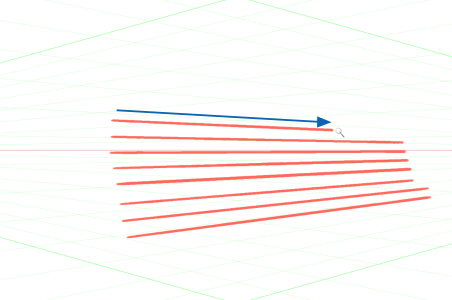
Painting in perspective aligns brushstrokes to vanishing points.
Depending on your workflow, you may choose to adjust the perspective guide settings by using the Stroke flyout on the Brush tool property bar, the property bar of the Perspective Guides tool, or the Perspective Guides panel. If using the feature for the first time, select the Perspective Guides tool, adjust the options you want, and save them as a preset once you are happy with your setup. When you start painting, you can quickly enable or disable the guides, change view options, and choose presets from the Stroke Options flyout on the Brush tool property bar. If you need to edit and reposition lines and vanishing points at any time, however, you can access the Perspective Guides tool from the Stroke Options flyout. When your changes are complete and you save your settings as presets, you have to select the Brush tool again to continue painting. If you often make changes to the guides, you can place the Perspective Guides panel in your workspace and keep it open. The panel allows you to access and adjust all perspective guide-related settings without the need to switch between tools.
You can modify the appearance of perspective guides by repositioning the vanishing point, the horizon line, and the primary lines. When you reposition the vanishing point, you can reposition both the horizon and the primary lines, or you can reposition only the primary lines by constraining the movement of the vanishing point along the horizon line. You can also rotate the primary lines to best suit your needs.
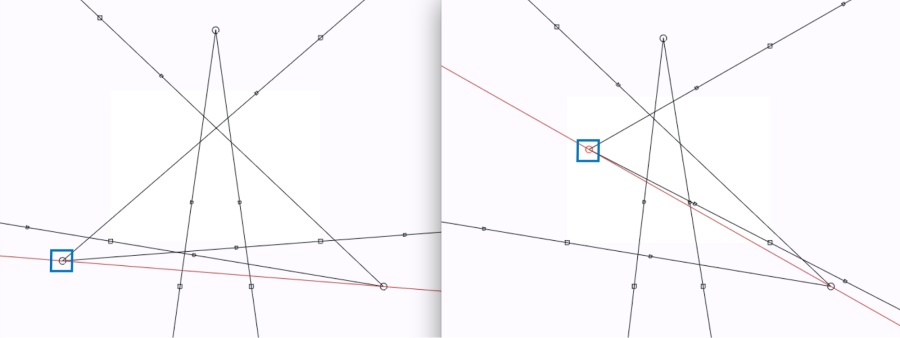
As you drag the vanishing point to a new location, both the horizon and primary lines are repositioned.
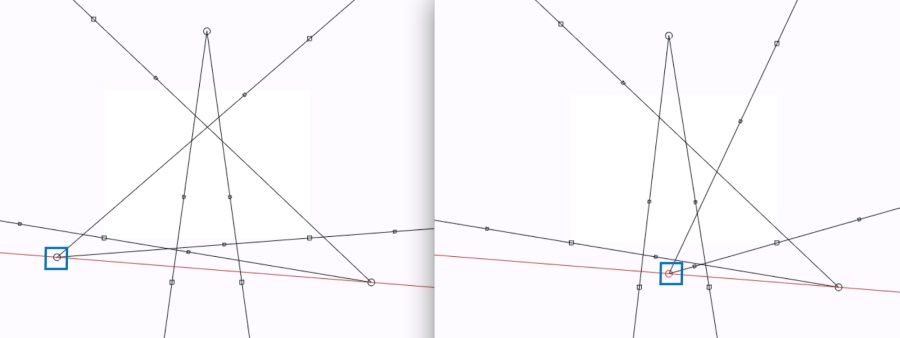
Hold down Shift as you drag the vanishing point to constrain the movement of the vanishing point along the horizon line and reposition only the primary lines.
In addition, you can change the color and opacity of all lines. You can also increase or decrease the density of the intermediate lines.
You can hide the perspective guides when you no longer need them.
To paint in perspective
To exit the perspective painting mode at any time, click the Stroke Options flyout button ![]() on the property bar, and click Align to Guides
on the property bar, and click Align to Guides ![]() .
.
You can also show or hide the perspective guides by clicking the Perspective Guides tool ![]() in the toolbox, and enabling or disabling the Perspective Guides check box on the property bar.
in the toolbox, and enabling or disabling the Perspective Guides check box on the property bar.
You can also enable or disable perspective mode by clicking the Perspective Guides tool ![]() in the toolbox, enabling the Perspective Guides check box on the property bar, and then enabling or disabling the Align to Guides check box on the property bar.
in the toolbox, enabling the Perspective Guides check box on the property bar, and then enabling or disabling the Align to Guides check box on the property bar.
To better display the guides, make sure you are in Full Screen mode. This allows you to reposition the guides to best suit your needs.
To reposition lines and the vanishing point
To display the Perspective Guides panel
To control the display of the primary lines
You can also control the display of the primary lines by clicking the Perspective Guides tool ![]() in the toolbox and adjusting any of the primary lines settings on the property bar.
in the toolbox and adjusting any of the primary lines settings on the property bar.
To control the display of the horizon line
You can also control the display of the horizon line by clicking the Perspective Guides tool ![]() in the toolbox and adjusting any of the horizon line settings on the property bar.
in the toolbox and adjusting any of the horizon line settings on the property bar.
To control the display of the intermediate lines
You can also control the display of the intermediate lines by clicking the Perspective Guides tool ![]() in the toolbox and adjusting any of the intermediate lines settings on the property bar.
in the toolbox and adjusting any of the intermediate lines settings on the property bar.
To save perspective guide settings as a preset
If you export your workspace, any perspective guides presets that you created are saved with the workspace.
You can also add a preset by clicking the Perspective Guides tool ![]() in the toolbox, enabling the Perspective Guides check box on the property bar, clicking the Preset flyout button, choosing Add from the list, entering a name, and clicking Save.
in the toolbox, enabling the Perspective Guides check box on the property bar, clicking the Preset flyout button, choosing Add from the list, entering a name, and clicking Save.
To delete a perspective guide preset
You can also delete a preset by clicking the Perspective Guides panel button ![]() on the property bar, clicking the Delete Preset button
on the property bar, clicking the Delete Preset button ![]() , choosing a preset name, and clicking Yes.
, choosing a preset name, and clicking Yes.