Setting basic brush attributes
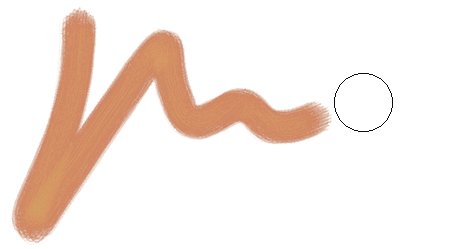
To quickly get started in Corel Painter, you specify basic brush attributes, such as brush size, opacity, and grain, on the property bar. Size determines the dimension of a single brush dab. You can also use the ghost brush to determine if a change in size is required. For more information, see Setting up the drawing cursor.
The ghost brush, the circle displayed to the right of the brushstroke, appears when a brush is selected and positioned over the canvas. It mirrors the size and shape of the brush dab.
Opacity controls the degree to which a stroke covers or builds up on the underlying pixels.
80% opacity (top) and 20% opacity (bottom)
Grain controls the interaction of color with the paper texture.
You can also set brush attributes, such as angle and squeeze, dynamically onscreen. A circle appears onscreen in the document window that lets you size and shape the brush within the context of the image.
The circle provides a visual representation of the brush size onscreen.
You can also access additional brush controls to further customize brushes. For example, you can set a minimum brushstroke size to control the tapering and widening of brushstrokes as stylus pressure or direction is varied. For more information, see Adjusting brushes with brush controls.
To set brush size

1
In the toolbox, click the
Brush tool

.
2
Click the Brush Selector on the Brush Selector bar.
3
Click a brush category, and click a brush variant.
4
On the property bar, move the
Size slider

, or type a value in the
Size box.
If you want to scale the brushstroke feature proportionally with the brush size, click the
Scale Feature with Brush Size button

on the property bar, which is available for some brushes.
Corel Painter may need to rebuild the brush after you resize it; therefore, you can expect a short delay.

You can also increase brush size incrementally by pressing the right square bracket ( ] ) key or decrease brush size by pressing the left square bracket ( [ ) key.
You can specify the default brush size increment value in pixels by choosing Corel Painter 2022  Preferences
  General (macOS) or Edit
  Preferences
  General (Windows) and typing a pixel value in the Brush size increment box.
You can also disable the scaling option in all areas by choosing Corel Painter 2022  Preferences
  General (macOS) or Edit
  Preferences
  General (Windows) and enabling the Disable feature scaling when resizing brush.
To set opacity

1
In the toolbox, click the
Brush tool

.
2
Click the Brush Selector on the Brush Selector bar.
3
Click a brush category, and click a brush variant.
4
On the property bar, move the
Opacity slider

, or type a percentage in the
Opacity box.
When the
Opacity setting is low, the applied color is thin, so you can see through to the underlying colors. When the setting is high, the applied color covers underlying pixels more completely.

Some methods and dab types do not allow you to adjust opacity.

When the Brush tool is active, you can set opacity by pressing a number key. Each number key is mapped to a fixed percentage. For example, 1 equals 10% opacity, 5 equals 50% opacity, and 0 equals 100% opacity.
To set grain

1
In the toolbox, click the
Brush tool

.
2
Click the Brush Selector on the Brush Selector bar.
3
Click a brush category, and click a brush variant.
4
On the property bar, move the
Grain slider, or type a percentage in the
Grain box.
Move the slider to the left to reduce penetration and reveal more texture. Move it to the right to increase penetration and reveal less grain.

For liquid media brushes, Grain controls the amount of "pull." For other brushes, such as airbrushes, the Grain slider is not available.
To set brush attributes onscreen

•
Perform a task from the following table.
|
|
|
|
|
Hold down Command + Option (macOS) or Ctrl + Alt (Windows), and drag the crosshair cursor to display the Radius circle in the document window. Keep dragging until the circle is set to the size that you want, and then release the stylus or mouse button. |
|
|
Hold down Command + Option (macOS) or Ctrl + Alt (Windows), and click the crosshair cursor to display the Radius circle in the document window. While pressing the stylus, or holding down the left mouse button, release the keys, and press Command (macOS) or Ctrl (Windows) once. Drag the Opacity circle in the image window until the circle is set to the opacity that you want, and then release the stylus or mouse button. |
Change the brush squeeze setting |
Hold down Command + Option (macOS) or Ctrl + Alt (Windows), and click the crosshair cursor to display the Radius circle in the document window. While pressing the stylus, or holding down the left mouse button, release the keys, and press Command (macOS) or Ctrl (Windows) twice. Drag the Squeeze circle in the document window until the circle is set to the brush squeeze that you want, and then release the stylus or mouse button. |
|
|
Hold down Command + Option (macOS) or Ctrl + Alt (Windows), and click the crosshair cursor to display the Radius circle in the document window. While pressing the stylus, or holding down the left mouse button, release the keys, and press Command (macOS) or Ctrl (Windows) three times. Drag the Angle circle in the document window until the circle is set to the angle that you want, and then release the stylus or mouse button. |

You can also revert to an onscreen brush sizing control that has the look and feel of the brush sizing control in earlier versions of Corel Painter by choosing Corel Painter 2022  Preferences
  General (macOS) or Edit
  Preferences
  General (Windows) and enabling the Simplified brush resizing control (Legacy-style) check box.
![]() Preferences
Preferences ![]() General (macOS) or Edit
General (macOS) or Edit ![]() Preferences
Preferences ![]() General (Windows) and typing a pixel value in the Brush size increment box.
General (Windows) and typing a pixel value in the Brush size increment box.![]() Preferences
Preferences ![]() General (macOS) or Edit
General (macOS) or Edit ![]() Preferences
Preferences ![]() General (Windows) and enabling the Disable feature scaling when resizing brush.
General (Windows) and enabling the Disable feature scaling when resizing brush.![]() Preferences
Preferences ![]() General (macOS) or Edit
General (macOS) or Edit ![]() Preferences
Preferences ![]() General (Windows) and enabling the Simplified brush resizing control (Legacy-style) check box.
General (Windows) and enabling the Simplified brush resizing control (Legacy-style) check box.

