| • | To apply a pattern as a fill |
| • | To adjust the appearance of a pattern |
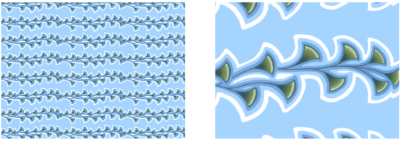
Left: A pattern scaled at 20%. Right: The same pattern scaled at 100%.

| To apply a pattern as a fill |
|
| 1 | Choose Window |
| 2 | Click the Pattern selector, and click a pattern in the Patterns library panel. |
| 3 | To apply a pattern to: |
| • | The canvas — Click Canvas in the Layers panel. |
| • | A selection — Click a selection tool from the toolbox, and drag in the document window to select an area. |
| • | A layer — Click a layer in the Layers panel. |
| 4 | Choose the Paint Bucket tool  from the toolbox. from the toolbox. |
| 5 | In the document window, click the canvas, selection, or layer. |
|
On the property bar, type a value in the Tolerance box or move the slider.
|
|
|
On the property bar, type a value in the Feather box or move the slider.
|
|
|
On the property bar, click the Anti-Alias button
 . .Anti-aliasing is desirable when the Feather setting is extremely low or set to zero.
|
The image must be larger than the tile in order for the tiling to be visible in an image.
You can also choose a pattern from the Pattern Selector in the toolbox or by choosing Edit ![]() Fill. In the Fill dialog box, choose Original Luminance from the Fill With list box, and click the Pattern selector. Note that the Pattern selector appears only if Current Pattern is selected in the Clone Source panel.
Fill. In the Fill dialog box, choose Original Luminance from the Fill With list box, and click the Pattern selector. Note that the Pattern selector appears only if Current Pattern is selected in the Clone Source panel.
| To adjust the appearance of a pattern |
|
| 1 | Choose Window |
| 2 | Click the Pattern selector, and click a pattern in the Patterns library panel. |
| 3 | Click one of the following buttons: |
| • | Rectangular Pattern Type  — places the tiles in a rectangular grid for fills. This option disables the Pattern Offset slider. — places the tiles in a rectangular grid for fills. This option disables the Pattern Offset slider. |
| • | Horizontal Pattern Type  — offsets the tiles in subsequent rows — offsets the tiles in subsequent rows |
| • | Vertical Pattern Type  — offsets the tiles in subsequent columns — offsets the tiles in subsequent columns |
If applicable, move the Pattern Offset slider  to control the amount of offset. to control the amount of offset. |
| 4 | Move the Pattern Scale slider  to control the size of each tile in the pattern. to control the size of each tile in the pattern. |
| After you set these options, the pattern is ready to use. |
Copyright 2016 Corel Corporation. All rights reserved.