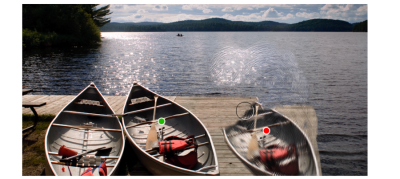
| • | To perform offset sampling within a document |
| • | To perform offset sampling between documents |
It is important to note that the sampling reference point, also known as the source, is not treated as a clone source. The sampled area does not display in the Clone Source panel.
| To perform offset sampling within a document |
|
| 1 | Click the Rubber Stamp tool  in the toolbox. in the toolbox. |
| If you want to adjust the size of the sampled area, type a value in the Size box, or adjust the slider on the property bar. |
| 2 | Hold down Option (Mac OS) or Alt (Windows), and click to set the source reference point. |
| A green marker appears on the image, indicating the reference point for the source image. |
| 3 | Hold down Option + Shift (Mac OS) or Alt + Shift (Windows), and click to set the destination reference point. |
| 4 | Apply brushstrokes to the destination area to reveal the sampled area. |
You can disable offset sampling by clicking the Clone Color button  in the Color panel or by clicking the Brush Selector on the Brush Selector bar, and choosing a non-Cloner brush variant. in the Color panel or by clicking the Brush Selector on the Brush Selector bar, and choosing a non-Cloner brush variant. |
|
On the property bar, type a percentage in the Opacity box, or adjust the slider.
|
|
|
On the property bar, type a value in the Stroke Jitter box, or adjust the slider.
|
You can also enable offset sampling by clicking the Cloner tool  in the toolbox.
You can set the destination area before painting by clicking while holding down Option + Shift (Mac OS) or Alt + Shift (Windows). A red marker indicates the destination area.
| To perform offset sampling between documents |
|
| 1 | Open both the image that you want to use as the sampling source and the image that you want to use as the destination. |
| If you want to view both images at once, you may want to arrange the images side-by-side. |
| 2 | With the source image selected, click the Cloner tool  in the toolbox. in the toolbox. |
| If you want to change the brush variant, click the Brush Selector, and click a Cloners brush variant in the Brush library panel. |
| 3 | Hold down Option (Mac OS) or Alt (Windows), and click the source document to set the sample source area reference point. |
| A green numbered marker appears on the image to indicate the reference point for the source area. |
| 4 | Hold down Option + Shift (Mac OS) or Alt + Shift (Windows), and click the destination document to set the destination reference point. |
| 5 | In destination document, apply brushstrokes to the canvas. |
You can disable offset sampling by clicking the Clone Color button  in the Color panel or by clicking the Brush Selector on the Brush Selector bar, and choosing a non-Cloner brush variant. in the Color panel or by clicking the Brush Selector on the Brush Selector bar, and choosing a non-Cloner brush variant. |
|
Type a value in the Size box, or adjust the slider on the property bar.
|
|
|
On the property bar, type a percentage in the Opacity box, or adjust the slider.
|
|
|
On the property bar, type a percentage in the Resat box, or adjust the slider.
|
|
|
On the property bar, type a percentage in the Bleed box, or adjust the slider.
|
|
|
On the property bar, type a value in the Feature box, or adjust the slider. The higher the setting, the farther apart the bristle hairs will appear.
|
|
|
Click the Scale Feature With Brush Size button
 on the property bar. on the property bar. |
Copyright 2016 Corel Corporation. All rights reserved.