Quick links to procedures on this page:
Whether you are new to digital painting software or a long-time user, Corel Painter makes it easy to adapt your design space to your needs. The interactive panels in Corel Painter are single tabbed containers that let you access content libraries, commands, controls, and settings. Panels are stored in palettes.
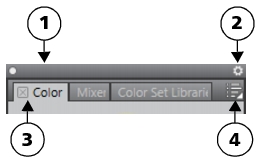
A typical palette features a header bar (1), a Palette Drawer button that lets you turn a palette into a palette drawer (2), panel tabs (3), and a Panel options button that allows you to access a series of related commands(4).
You can increase your efficiency by arranging task-related or frequently used panels into palettes. For example, you can display all color-specific panels in one color palette, or display panels individually. A palette can contain one or more panels.
This palette includes three color-related panels: Color, Mixer, and Color Set Libraries. You can access a panel’s content by clicking its tabs.
Corel Painter includes the Brush controls palette, which is a preset palette that groups all panels that contain brush-related settings.
You can add panels to and remove panels from a palette. You can also reposition a panel within a palette group or move a panel to another palette group. You can turn a palette into a palette drawer, so you can quickly collapse it to save screen space. At any time, you can turn a palette drawer back into a regular palette. You can resize and reposition a palette drawer like any other palette group.
You can display and hide a panel or palette. When you hide a panel or palette, they are no longer displayed in the application window. If you want to keep the panel or palette at hand, but save screen space, you can resize or collapse them.
You can also arrange panels and palettes in the application window to quickly access the tools and controls that you use most often or to maximize screen space. Palettes and panels float in the workspace. Docking attaches the panel or palette to the vertical edge of the application window. Undocking detaches them from other parts of the workspace, so you can move them. To perform docking, you need to grab a panel’s tab or a palette’s header bar.
You can save the arrangement of palettes as a custom workspace layout for later use, and you can delete this custom workspace layout when you no longer need it.
| • |
Click the Palette Drawer toggle button  on the palette header bar, and click Palette Drawer. on the palette header bar, and click Palette Drawer. |

To rename a palette drawer, click the Palette Drawer toggle button  on the palette header bar, click Rename, and type a new name.
To turn a drawer into a regular palette, click the Palette Drawer toggle button  on the drawer header bar, and then click Palette Drawer.
|
|
|
|
|
Click the Close button  on the panel tab.
|
|
|
Click the Close button  on the header bar.
|
|
|
Choose Window  [ Panel name].
|
|
|
Choose Window  Palette Drawers Palette Drawers  [ Palette Drawer name].
|

When you choose Window  Show Panels, only the panels that were open when you chose Hide Panels are displayed.

You can restore a previously hidden palette by choosing Window, and choosing the name of a panel that is contained in the palette.

If there’s not enough space along the vertical edge of the application window (for example, if you have a lot of expanded palettes), you may not be able to dock a panel or a palette. Collapse one or multiple panels to create sufficient space for docking.
You cannot dock a palette drawer.
You cannot dock panels or palettes with toolbars.
|
1
|
Choose Window  Layout Layout  Save Layout. Save Layout. |
|
2
|
In the Palette Layout Name dialog box, type a name in the New Layout list box. |

You can display a saved arrangement of palettes by choosing Window  Layout
  [Layout name].
You can restore the default palette arrangement at any time by choosing Window  Layout
  Default.
|
1
|
Choose Window  Layout Layout  Delete Layout. Delete Layout. |
|
2
|
In the Delete Palette Layout dialog box, choose a layout from the Palette Layout list box. |
Copyright 2016 Corel Corporation. All rights reserved.

 on the palette header bar, and click Palette Drawer.
 on the palette header bar, click Rename, and type a new name.
 on the drawer header bar, and then click Palette Drawer.
 on the panel tab.
 on the header bar.
![]() Show Panels, only the panels that were open when you chose Hide Panels are displayed.
Show Panels, only the panels that were open when you chose Hide Panels are displayed. , and choose an option.
![]() Layout
Layout ![]() [Layout name].
[Layout name].![]() Layout
Layout ![]() Default.
Default.