Corel Painter Help :
Hard Media : Controlling the behavior of Hard Media variants
Quick links to procedures on this page:
Corel Painter lets you control how a Hard Media variant behaves when you apply strokes to the canvas. The Stepping slider controls the transition between narrow and wide sections of a stroke. Moving the slider to the right makes the transition appear more abrupt, and moving it to the left makes the transition smoother.
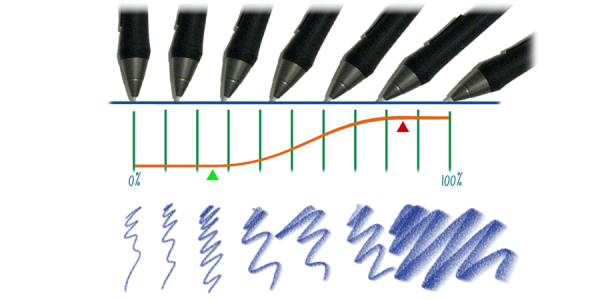
The Transition Range sliders lets you determine the angle at which you transition from a fine point to a wider stroke when tilting your stylus. This control lets you simulate the look and feel of hard media such as pencils or markers. A real-world example of this would be holding a sharp pencil perpendicular to a piece of paper. When you draw at a 90° angle, you produce a very narrow or hard line. If you tilt your pencil to a 60° angle, you produce a wider or softer line.
At the top of the image, a stylus is shown tilting at different angles and the stoke that corresponds with the angle is displayed at the bottom of the image. The graph in the middle of the image identifies the start (green arrow) and the Finish (red arrow) of the Transition Range.
The Hard Media controls are usable only with the Circular, Captured, and Eraser dab types. For more information, see General controls.
| 1 . |
With a Hard Media variant active, choose Window  Brush Control Panels Brush Control Panels  Brush Shape Brush Shape  Hard Media. Hard Media. |
| 2 . |
Move the Size Step slider to the right to produce fewer angles between dabs, or move it to the left to create more angles between dabs. |
| 1 . |
With a Hard Media variant active, choose Window  Brush Control Panels Brush Control Panels  Brush Shape Brush Shape  Hard Media. Hard Media. |
| 2 . |
Move the Start slider to set the angle at which the transition will start. |
| 3 . |
Move the Finish slider to set the angle at which the transition will finish. |
