| • | To create a marbling recipe |
| • | To save or load a recipe |
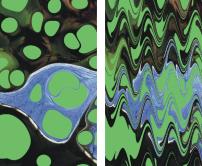
The Marbling effect creates intricate distortions of an image, following a technique that dates back to the 12th century. Marbling is created by dragging a fork, or rake, across an image, which produces an effect similar to a fork dragging through a mix of chocolate syrup and melted ice cream.
Before (left) and after (right) applying the Marbling effect.
Marbling works best with patterns or textures. Using the Blobs effect is an excellent way of creating the raw materials for marbling; filling with a pattern is another. For more information, see Applying Blobs.
| To create a marbling recipe |
|
| 1 | To apply the effect to: |
| • | The canvas — Click the Canvas in the Layers panel. |
| • | A selection — Click a selection tool from the toolbox, and drag in the document window to select an area. |
| • | A layer — Click a layer in the Layers panel. |
| 2 | Choose Effects |
| 3 | Move any of the following sliders: |
| • | Spacing — adjusts the distance between rake teeth, which controls the number of teeth in the rake. When the slider is all the way to the right, the rake has one tooth. |
| • | Offset — moves the rake in a perpendicular direction to the path direction, which adjusts the position of the rake lines |
| • | Waviness — changes the amplitude (height) of the waves. When this slider is set to zero, the path is straight. |
| • | Wavelength — determines the distance between wave peaks |
| • | Phase — moves the wave in the rake direction. This lets you set where in the curve (peak, downslope, valley, or upslope) the rake begins in the image. |
| • | Pull — controls how much the rake distorts the image. Lower values produce thin, short distortions. Higher values create stronger distortions. |
| • | Quality — lets you control the smoothness in the marbled image. Low settings produce an aliased effect. The marbling looks rough with scattered pixels. Increasing the Quality setting adds anti-aliasing, making color distortions appear smoother and more fluid. |
| As you move the sliders, the dotted lines in the preview window show the rake path. |
| 4 | In the Direction area, enable an option for the rake stroke. |
| 5 | Click the Add Step button |
| 6 | Repeat steps 3 to 5 for each rake step you want to create. |
| The Apply Marbling dialog box displays the current step number and the total number of steps in the recipe. You can move between steps by clicking the forward and backward arrow buttons. |
Steps are applied in order, so subsequent steps are based on the result of each previous one.
Each step you add increases the time it takes to apply the recipe.
| To save or load a recipe |
|
| • | Perform an action from the following table: |
|
In the Apply Marbling dialog box, click Reset. The current recipe is deleted.
|
|
|
In the Apply Marbling dialog box, click Save All Steps. In the Save Marbling dialog box, specify a name.
|
|
|
In the Apply Marbling dialog box, click Load Marbling Steps. In the Marbling Recipes dialog box, choose a recipe.
|
Copyright 2014 Corel Corporation. All rights reserved.