| • | To apply a pattern as a fill |
| • | To adjust the appearance of a pattern |
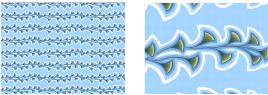
Left: A pattern scaled at 20%. Right: The same pattern scaled at 100%.
| To apply a pattern as a fill |
|
| 1 | Choose Window |
| 2 | Click the Pattern selector, and click a pattern in the Pattern library panel. |
| 3 | To apply a pattern to: |
| • | The canvas — Click the Canvas in the Layers panel. |
| • | A selection — Click a selection tool from the toolbox, and drag in the document window to select an area. |
| • | A layer — Click a layer in the Layers panel. |
| 4 | Choose the Paint Bucket tool |
| 5 | In the document window, click the canvas, selection, or layer. |
|
On the property bar, type a value in the Tolerance box or adjust the slider.
|
|
|
On the property bar, type a value in the Feather box or adjust the slider.
|
|
|
On the property bar, click the Anti‑Alias button
Anti-aliasing is desirable when the Feather setting is set to zero or extremely low.
|
The image must be larger than the tile in order for the tiling to be visible in an image.
You can also choose a pattern from the Pattern Selector in the toolbox or by choosing Edit ![]() Fill.
Fill.
| To adjust the appearance of a pattern |
|
| 1 | Choose Window |
| 2 | Click the Pattern selector, and click a pattern in the Pattern library panel. |
| 3 | Enable one of the following options: |
| • | Rectangular Pattern Type |
| • | Horizontal Pattern Type |
| • | Vertical Pattern Type |
| If applicable, adjust the Pattern Offset slider |
| 4 | Adjust the Pattern Scale slider |
| After you set these options, the pattern is ready to use. |
Copyright 2013 Corel Corporation. All rights reserved.