Adjusting brightness, contrast, and clarity
Corel PaintShop Pro lets you adjust the brightness, contrast, and clarity in your photos. Contrast is the difference between the photo’s lightest and darkest pixels. Clarity lets you adjust the level of detail in the image by analyzing contrast within localized areas.
By applying the commands to a selection or an entire image, you can do the following:
• |
manually adjust the brightness and contrast
|
• |
give your photo a crisp, focused look to make the subject more
prominent
|
• |
adjust the individual brightness values in your image
|
• |
adjust the highlights, midtones, and shadows to provide smooth
tonal transitions
|
• |
correct the exposure
|
• |
distribute the lightness values of pixels more evenly across the
lightness spectrum from black to white
|
• |
increase the overall contrast when the histogram does not cover
the entire lightness spectrum
|
• |
make adjustments to the brightness, contrast, and gamma in the
image
|
• |
create a purely black-and-white image
|
Histograms
A histogram lets you display the tonal range of an image and redistribute the balance of highlights, midtones, and shadows. In other words, the histogram can reveal whether your photo is underexposed, overexposed, or exposed properly.
Many digital cameras offer a histogram display on the camera’s LCD, and some cameras even let you adjust the scene’s histogram before you take the photo.
Corel PaintShop Pro has various commands that display the histogram in the dialog box. These commands include Curves, Levels, the advanced mode of Smart Photo Fix, and Histogram Adjustment.
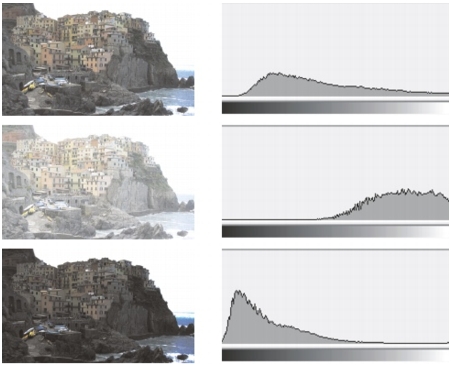
Example of histograms (right) for three different exposures.
Note the following when you look at a histogram:
• |
The left portion of the histogram reveals how much of the photo
is black or nearly black.
|
• |
The right portion of the histogram reveals how much of the photo
is white or nearly white.
|
The graph in the Histogram Adjustment dialog box displays the number of pixels for each value of the selected channel. The vertical axis represents the number of pixels and ranges from zero to the highest number of pixels in the graph. The horizontal axis represents the value of the selected channel, from 0 to 255.
You can display a Histogram for an image at any time by choosing View ![]() Palettes
Palettes ![]() Histogram.
Histogram.
| To change brightness or contrast |
Edit workspace
1 |
Choose Adjust |
The Brightness/Contrast dialog box appears. |
2 |
Type or set a value in the Brightness control.
|
A positive number lightens the photo; a negative number darkens the photo. A value of zero preserves the original setting. |
3 |
Type or set a value in the Contrast control.
|
A positive number increases contrast; a negative number decreases contrast. A value of zero preserves the original setting. |
4 |
Click OK.
|
You can use the zoom control in the dialog box to set your view
of the image in the Before and After panes.
|
| To brighten dark areas and adjust clarity |
Edit workspace
1 |
Choose Adjust |
The Fill Light/Clarity dialog box appears. |
2 |
Type or set a value in the Fill Light control.
|
A positive number lightens the darkest areas of the photo; a negative number darkens the light areas of the photo. A value of zero preserves the original setting. |
3 |
Type or set a value in the Clarity control.
|
A positive number increases detail; a negative number decreases detail and focus. A value of zero preserves the original setting. |
4 |
Click OK.
|
| To enhance depth and clarity |
Edit workspace
1 |
Choose Adjust |
The Local Tone Mapping dialog box appears. |
2 |
Type or set a value in the Strength control.
|
Use the smallest value that produces a satisfying result. Values that are too high cause unwanted artifacts to appear in the photo. |
3 |
Click OK.
|
You can use the zoom control in the dialog box to set your view
of the image in the Before and After panes.
|
| To change color channel brightness |
Edit workspace
1 |
Choose Adjust |
The Curves dialog box appears. |
2 |
In the Channel drop-list, select one of the following color channel
options:
|
• |
RGB — lets you edit the red, green, and blue channels in a
combined histogram
|
• |
Red — lets you edit the red channel only
|
• |
Green — lets you edit the green channel only
|
• |
Blue — lets you edit the blue channel only
|
3 |
Drag points on the graph to adjust the relationship between the
input levels (the brightness of the original pixels) and the output
levels (the brightness of the corrected pixels).
|
As you drag a curve point, the point’s original and modified values for pixel lightness are displayed in the upper-left corner of the histogram graph. The original or input value appears on the left), and the modified or output value appears on the right. |
4 |
Click OK.
|
You can use the zoom control in the dialog box to set your view
of the image in the Before and After panes.
|
| To adjust a photo’s highlights, midtones, and shadows |
Edit workspace
1 |
Choose Adjust |
The Highlight/Midtone/Shadow dialog box appears. |
2 |
Choose one of the following options:
|
• |
Absolute adjustment method — sets the absolute positions of
the 25% histogram point (Shadows), the 50% histogram point
(Midtones) and the 75% histogram point (Highlights). Typical
values are about 35 for Shadow, 50 for Midtone, and 65 for
Highlight, but they vary, depending on the photo. Increasing the
value lightens the region, and decreasing the value darkens the
region.
|
• |
Relative adjustment method — adjusts the lightness levels
relative to their original states. Positive values lighten the region,
and negative values darken it.
|
3 |
Type or set values in the Shadow, Midtone, and Highlight controls.
|
4 |
Click OK.
|
You can use the zoom control in the dialog box to set your view
of the image in the Before and After panes.
|
| To correct exposure by using the histogram |
Edit workspace
1 |
Choose Adjust |
The Histogram Adjustment dialog box appears. |
2 |
In the Edit group box, choose one of the following options:
|
• |
Luminance — lets you set the lightness values of the image to
correct contrast
|
• |
Colors — lets you choose a color channel to edit
|
If you choose the Colors option, you must choose a color from the drop-list. |
3 |
In the Load Preset drop-list, choose Default.
|
The default values represent no adjustment to the image. |
4 |
Adjust the Low slider.
|
On the left side of the histogram, look for a gap between the left edge and the point where the graph starts to rise. A gap shows that the darkest pixels in the image are not completely black. Drag the Low slider (the black triangle) to the point where the graph rises. The Low control displays the low position (from 0 to 254). The bottom control displays the percentage of pixels that are between zero and the low value; contrast for these pixels will be lost. As a general rule, keep the Low value lower than 0.1%. |
5 |
Adjust the High slider.
|
On the right side of the histogram, look for a gap between the right edge of the window and the point where the graph decreases to zero pixels. If there is a gap, drag the High slider (the white triangle) to that point on the graph. This action changes the lightest pixels in the image to white. As a general rule, keep the High value lower than 0.1%. |
6 |
Adjust the Gamma slider.
|
If the overall image is too dark or too light, adjust the gamma, which is a standard measure of change in an image’s contrast. To lighten the image, increase the gamma by dragging the Gamma slider (the gray triangle) to the right. To darken the image, decrease the gamma by dragging the Gamma slider to the left. |
7 |
Adjust the Midtones slider.
|
If the graph has peaks on the left and right sides and contains low points in the center, the midtones need to be compressed. Shadows and highlights must be expanded to reveal the information they contain. Photography subjects that are too close to the camera appear brightly illuminated against a dark background. To compress the midtones, drag the Midtones slider up. |
If the graph peaks in the center and has a low number of pixels at the left and right sides, expand the midtones by dragging the Midtones slider down. |
8 |
Click OK.
|
You can create artistic effects by using the Output Max and
Output Min controls on the left side of the histogram. The Max
slider is the white circle within a gray square; the Min slider is
the black circle within a gray square. To darken the image’s
lightest pixels, drag the Max slider down. To lighten the image’s
darkest pixels, drag the Min slider up. Even though you are
dragging sliders along the vertical axis, the Max and Min values
(from 0 to 255) affect the horizontal axis. All pixels outside the
range are converted so that they fall within the range. You can
choose another color component from the Edit drop-list and
make similar adjustments.
|
| To distribute lightness across a photo |
Edit workspace
• |
Choose Adjust |
| To increase contrast by stretching the histogram |
Edit workspace
• |
Choose Adjust |
The Histogram Stretch command pulls the darkest pixel down
to black and the lightest pixel up to white. This command does
not affect images that already span from pure black to pure
white. If the original image has pixels that are very close to black
and white, using this command will have a very small effect. If
the original image is very flat (nothing close to black or white),
using this command will have a strong effect.
|
| To adjust brightness, contrast, and gamma simultaneously |
Edit workspace
1 |
Choose Adjust |
The Levels dialog box appears. |
2 |
In the Levels group box, choose the color channel to adjust from
the Channel drop-list:
|
• |
RGB — lets you edit the red, green, and blue channels in a
combined histogram
|
• |
Red — lets you edit the red channel only
|
• |
Green — lets you edit the green channel only
|
• |
Blue — lets you edit the blue channel only
|
3 |
Adjust the black, gray, or white diamond sliders, or set values in
the controls beneath them.
|
• |
To darken the darkest pixels in the photo, drag the black
diamond slider to the right (or set a value in the numeric
control).
|
• |
To adjust the photo’s midtones, drag the gray (middle) diamond
to the left or right (or set a value in the numeric control).
|
• |
To lighten the lightest pixels in the photo, drag the white
diamond slider to the left (or set a value in the numeric control).
|
To see which pixels are being clipped as you drag either the black or white diamond slider, hold down Ctrl as you drag. The After pane displays the clipped colors. |
4 |
Click OK.
|
Changes you make in the Auto Color Options dialog box are
applied when you use the Contrast, Curves, and Levels buttons
in the Auto group box of the Curves dialog box.
|
You can use the Levels command to spread out the histogram
for a photo taken with an improper exposure. You may find it
helpful to use this command before using the Curves
command.
|
You can use the zoom control in the dialog box to set your view
of the image in the Before and After panes.
|
| To convert a photo’s pixels to black and white |
Edit workspace
1 |
Choose Adjust |
The Threshold dialog box appears. |
2 |
Type or set a value for pixel lightness in the Threshold control to
specify which pixels to change to white (those above the
threshold) and which pixels to change to black (those below the
threshold).
|
Values range from 1 to 255. Lower values produce more white pixels; higher values produce more black pixels. |
3 |
Click OK.
|
You can use the zoom control in the dialog box to set your view
of the image in the Before and After panes.
|