Modifying selections
Selections can be modified in various ways. You can modify a selection by adding image content to it or by subtracting image content from it. For example, in a picture of a person carrying a large sign, you can select the sign by using the rectangular Selection tool and then add the person to the selection by using the Freehand Selection tool.
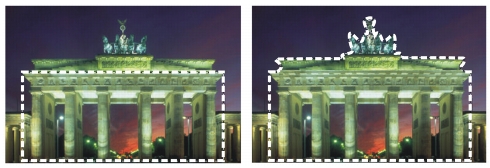
After you create a selection, you can add to it.
You can also expand or contract a selection by a specific number of pixels.
You can add or remove a color from a selection, or from the selection border. When the color is added or removed, the selection border changes.
You can also add pixels to a selection based on color values.
If specks or holes appear in a selection, you can remove them by defining an area in square pixels. For example, if your image is 20 pixels wide by 20 pixels high, you can define an area of 5 pixels multiplied by a scale factor of 100 to cover an area of 500 pixels. Because the image covers an area of only 400 pixels (20 × 20 = 400), all specks and holes will be removed.
You can also modify a selection by using tools and effects.
| To add to or subtract from a selection |
Edit workspace
1 |
On the Tools toolbar, choose a selection tool (Selection |
2 |
Choose settings for the tool on the Tool Options palette.
|
3 |
Perform a task from the following table.
|
You can also add to a selection by holding down Shift while
clicking the image areas that you want to add, or subtract from
a selection by holding down Ctrl while clicking the image areas
that you want to remove.
|
| To expand a selection by a specific number of pixels |
Edit workspace
1 |
Choose Selections |
The Expand Selection dialog box appears. |
2 |
Specify a value in the Number of pixels control by which to expand
the selection.
|
3 |
Click OK.
|
The selection marquee expands while retaining its original shape. |
| To contract a selection by a specific number of pixels |
Edit workspace
1 |
Choose Selections |
The Contract Selection dialog box appears. |
2 |
Specify a value in the Number of pixels control by which to
contract the selection.
|
3 |
Click OK.
|
The selection marquee contracts while retaining its original shape. |
| To add pixels to a selection according to color values |
Edit workspace
1 |
Choose Selections |
2 |
Check the settings of the following controls on the Tool Options
palette, and modify them if necessary:
|
• |
Tolerance — specifies how closely pixels must match the colors
of the initial selection. At lower settings, the values are closer,
and more pixels are excluded from the selection. At higher
settings, the values do not need to be as close, and more pixels
are included in the selection.
|
• |
Sample Merged — selects matching pixels in the merged image.
If the check box is unmarked, only pixels in the active layer are
selected.
|
• |
Anti-alias — produces a smooth-edged selection by partially
filling in pixels along the edge, making them semitransparent.
Mark the Inside or Outside options, depending on whether you
want the areas inside or outside the selection marquee to be
anti-aliased. To retain the original edges, unmark the Anti-alias
check box.
|
• |
Contiguous — selects all pixels of a similar color in adjacent
areas
|
• |
Discontiguous — selects all pixels of a similar color anywhere
within the image
|
3 |
Click OK.
|
The selection changes to include similar pixels. |
The Select Similar command produces the best results when the
selection is not anti-aliased.
|
| To add or remove a color from a selection |
Edit workspace
1 |
Choose Selections |
2 |
Choose one of the following options:
|
• |
Add color range
|
• |
Subtract color range
|
3 |
Click a color in the image that you want to add or remove from
the selection.
|
4 |
In the Tolerance box, specify a color tolerance value (0 to 256).
|
Shades of the color or related colors are added or removed from the selection. |
5 |
In the Softness box, specify the amount of softness for the
referenced color.
|
6 |
Click OK.
|
The selection borders change to add or exclude the color you specified. |
You can click the Toggle Selection button |
You can also choose a color to add or remove by clicking in the
Reference color box in the Select Color Range dialog box.
|
To remove a color from a selection, you can also choose Edit |
| To remove holes and specks from a selection |
Edit workspace
1 |
Choose Selections |
The Remove Specks and Holes dialog box appears. |
2 |
Choose one of the following options:
|
• |
Remove Specks
|
• |
Remove Holes
|
• |
Remove Specks and Holes
|
3 |
In the Square area smaller than boxes, enter the number of pixels
and the scale factor. Start at low values, and increase them as
necessary until the specks and holes are removed.
|
4 |
Click OK.
|
The holes and specks in the selection are removed. |
You can click the Toggle Selection button |
| To modify a selection by using tools and effects |
Edit workspace
1 |
Choose Selection |
A ruby overlay appears in the selected area. |
2 |
Apply a tool or effect to the selection area.
|
3 |
When you are finished editing the selection, choose Selection |
You can also modify a selection by clicking the Edit Selection
button |