Combining photos with Photo Blend
Photo Blend lets you combine two or more photos of the same scene and choose exactly what you want to keep and remove from the scene. Here are some examples:
• |
Remove moving objects, such as people or cars, from a photo —
you can create an empty street in a busy city.
|
• |
Fix a group shot where one person blinks or looks away — simply
swap in a better pose from another photo.
|
• |
Get creative by showing the same person multiple times in a single
photo.
|
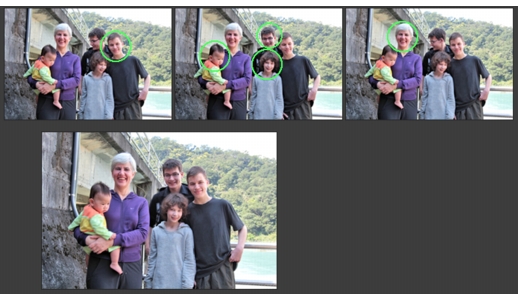
Photo Blend can be used to create perfect group shots.
Watch a video: Photo Blend
How do I take photos that work with Photo Blend?
From a tripod or with a steady rest, shoot two or more photos a few seconds apart. Use the same camera settings for all the photos.
![]()
Photo Tip: Use the manual setting on your camera so you can
ensure that the photos have the same size, aperture, shutter
speed, and ISO.
|
| To use Photo Blend |
1 |
In the Manage workspace, select the set of photos that you want
to blend.
|
2 |
Click File |
3 |
In the Alignment area, click Align.
|
If you want to crop unaligned edges along the borders of the photos, mark Auto crop. |
4 |
Click a thumbnail in the tray.
|
The corresponding photo displays in the preview area. |
5 |
In the Custom editing area, do any of the following:
|
• |
Click Brush in, and in the preview area, drag over the area that
you want to preserve. You don't need to be exact.
|
• |
Click Brush out, and in the preview area, and drag over the area
that you want to remove.
|
• |
Click Auto brush if you want the application to auto-detect the
differences between the images. Leave the brushmarks as they
are to remove ghosting and other differences, or use it as a
starting point for custom brushstrokes.
|
6 |
Repeat the editing process for other photos by clicking thumbnails
in the tray and applying brushstrokes.
|
7 |
Click Process.
|
Review the results in the preview area. If you want to adjust your settings or continue editing, click Back. |
8 |
In the Step 2: Fine-Tune panel, use any of the tools or adjustment
controls to fine-tune the image. For more information, see Using
the Adjust workspace.
|
9 |
Click Save and close.
|
10 |
In the Save As dialog box, navigate to the folder you want, type a
file name, and choose a file type from the Save as type drop-list.
|
For best results, in the tray of the Step 1 window, click the
thumbnail of the image that will change the least, and click the
lock button |