Creating screen capture videos
Record computer actions and mouse movement by using the screen capture feature in Corel VideoStudio Pro. This feature lets you create videos that require visualization in a few easy steps. You can also define the capture area for more emphasis and focus or integrate voice-overs.
To open the Active Screen capture window
*
*
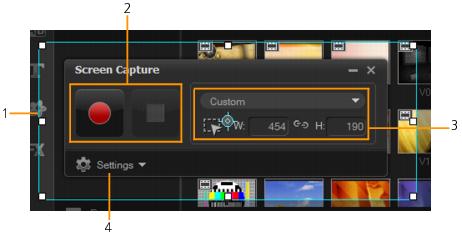
Click Screen Capture in the Capture Step Options Panel to launch the Screen Capture toolbar. The Corel VideoStudio Pro main program window minimizes in the background and the Screen Capture toolbar appears.
*
Click Screen Capture from Record/Capture Option .
*
Double-click the Corel ScreenCap X6 desktop shortcut or from the program group in the Start menu.
The capture area frame automatically covers the entire screen by default and appears along with the Screen Capture toolbar.
Toolbar Basics
 
Recording your screen
Before taking the actual screen capture, make sure to configure the settings of the video first.
To configure your video
1
Click Settings.
2
In File Settings, specify the following details:
*Filename — Enter a filename for your project.
*Save to — Lets you specify the location where you want to save the video file.
*Capture to library — Enable to automatically import your screen capture to the Library and identify the save path in the Library.
Note: Screen captures are saved to the Samples folder in the Library by default. Click to add a new folder and change the location where the file is saved.
*Format — Choose an option from the available formats in the drop-down menu.
*Frame rate — Lets you specify the number of frames to be used when recording.
Note: Using a lower frame rate is ideal for uploading videos to the Internet as it yields a smaller file size but with less accuracy on screen dynamics. A higher frame rate produces a larger file size and is most useful for detailed presentations to capture actual screen dynamics.
3
In Audio Settings > Voice, do one of the following:
*Click Enable voice recording to record a voice-over. Click the Sound Check button to test your voice input.
*Click Disable voice recording to disable voice-over recording.
4
Enable or disable System audio and adjust the slider to your preference.
5
In Control Settings, the following options are available:
*Mouse click animation — Enable to include mouse clicks in the screen capture.
*Enable F10/F11 shortcut key — Turns the keyboard shortcuts for screen capture on and off.
Note: If the screen capture shortcut keys are in conflict with the program you want to capture, it is recommended that you disable this feature to avoid accidental stops or pauses while recording.
6
In Monitor Settings, choose a display device.
Note: The program automatically detects the number of display devices available on your system. Primary monitor is selected by default.
To record your screen capture
1
*Full screen — lets you capture the entire screen. When you launch the Screen Capture toolbar, this option is enabled by default.
*Custom — lets you specify the area to capture. The capture area dimensions are displayed accordingly. You can also specify an application window to capture by choosing an option from the list of active programs.
2
Click Settings to access more options.
Note: To include voice-overs and system audio, you must enable and configure the respective settings before you start recording.
3
Click Start / Resume Recording to start the screen capture.
All activities inside the specified capture area are recorded. Screen capture starts after the countdown.
Note: You can press F10 to stop and F11 to pause or resume the screen capture.
4
Click Stop Recording to finish your screen capture.
The screen capture is added to the Library and the custom folder that you have specified and can be imported into the Corel VideoStudio Pro Timeline.