Project Timeline
The Project Timeline is where you assemble the media clips for your video project.
Two types of views are displayed in the Project Timeline: Storyboard View and Timeline View. To switch between the different views, click the buttons at the left side of the Toolbar.
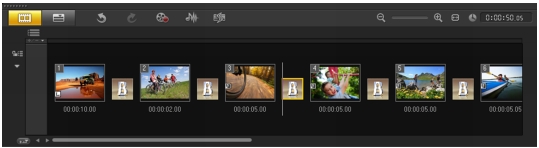
Storyboard View
The fastest and simplest way to organize photos and video clips in a project is to use the Storyboard View. Each thumbnail in the storyboard represents a photo, video clip, or a transition. Thumbnails are shown in the order in which they appear in your project, and you can drag thumbnails to rearrange them. The duration of each clip is shown at the bottom of each thumbnail. In addition, you can insert transitions between video clips, and you can trim a selected video clip in the Preview Window.
Timeline View
Timeline View gives you the most comprehensive display of the elements in your movie project. It divides a project into separate tracks for video, overlay, title, voice, and music.
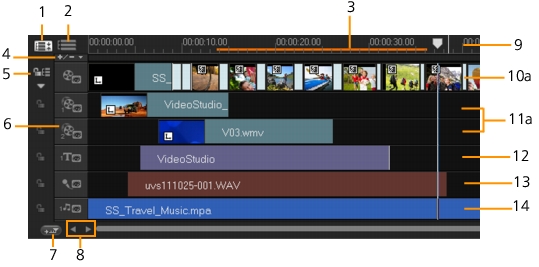
Corel VideoStudio Pro Timeline
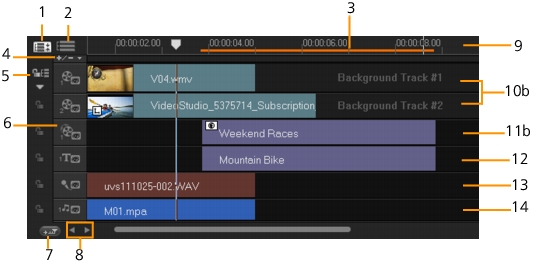
Corel VideoStudio Pro Timeline in HTML5 Mode
To move between tracks, click the track buttons. You can use the
mouse wheel to scroll through the Project Timeline.
|
Right-click on any track button and choose Select all media to
select all media clips that are in the track.
|
When the pointer is at the Zoom controls or Timeline ruler, you
can use the wheel to zoom in and out of the Project Timeline.
|
You can show or hide tracks from playback or when you render
your video. For more information, see Enabling and disabling
tracks.
|
|
|
Was this page helpful? Send feedback. (Internet connection required.)
|
Copyright 2012 Corel Corporation. All rights reserved.