The Share Step Options Panel
In the Share tab, Corel VideoStudio Pro displays the Media Clips Library and the Share Options Panel. In the Share Options Panel are the following tasks:
• |
• |
• |
For more information on Corel DVD Factory Pro 2010, see the Online Help. |
• |
• |
• |
• |
• |
• |
Create video file
Before rendering your entire project into a movie file, select File: Save or Save As to save it first as a Corel VideoStudio Pro project file (*.VSP). This allows you to return to your project anytime and make edits.
| To create a video file of the entire project |
1 |
Click |
2 |
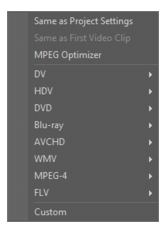
To create a movie file using the current project settings, select Same
as Project Settings.
|
Or, select one of the preset movie templates. These templates let you create a movie file that is suitable for the Web or for output to DV, DVD, WMV, and MPEG-4. |
To check current project settings, select Settings: Project Properties. To check the saving options provided by a movie template, select Settings: Make Movie Templates Manager. |
You can also use the settings of the first video clip in the Video Track by selecting Same as First Video Clip. |
3 |
Enter the desired file name for your movie and click Save. The movie
file will then be saved and placed in the Video Library.
|
To save on rendering time, use the same settings for your source video (e.g. captured video), Corel VideoStudio Pro project, and movie template. |
You can also render your project partially. SmartRender technology saves time when generating previews by rendering only the parts that have been modified from your last render operation.
You can click Pause on the progress bar to stop rendering, and
you can resume whenever you are ready. You can also enable
playback while rendering or stop the preview for a faster and more
efficient rendering of your project.
|

| To create a video file of the preview range |
1 |
Make sure that no clip is selected by clicking on the Timeline or by
clicking Project in the Preview Window.
|
2 |
Select a preview range using the Trim Markers. You may also drag
the triangle along the ruler then press [F3] and [F4] to mark the start
and end points respectively.
|
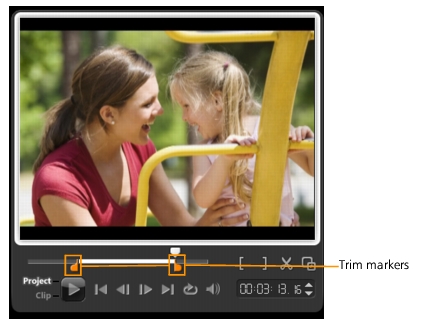
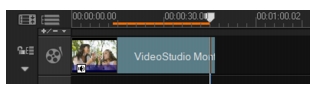
An orange line representing the selected range should appear on the Timeline ruler. |
3 |
Click |
4 |
Select a movie template.
|
5 |
In the Create Video File dialog box, click Options. In the Options
dialog box, select Preview range. Click OK.
|
6 |
Enter a file name and click Save.
|
Optimizing MPEG video settings
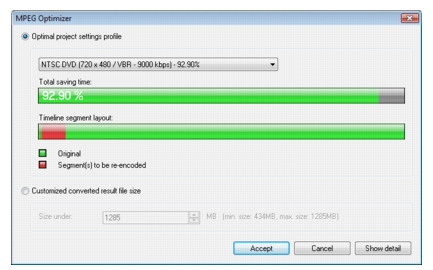
MPEG Optimizer makes creating and rendering movies in MPEG format a lot faster. It analyzes and finds the best MPEG settings or the Optimal project settings profile to use and maintains the quality of your project. As an additional feature, you can now specify the target file size of your output to comply with file size limitations for your desired output.
Upon clicking Create Video File, select MPEG Optimizer from the pop-up menu. Corel VideoStudio Pro displays the MPEG Optimizer dialog box where it shows the resulting file size of your project should you choose to apply the optimization.
The MPEG Optimizer automatically detects changes in your project and renders out only the edited portions for faster rendering times.
| To use MPEG Optimizer |
1 |
In the Share Step Options Panel, click |
MPEG Optimizer is automatically enabled when an MPEG movie template is selected. To stop showing MPEG Optimizer dialog box when selecting MPEG movie templates, deselect Show MPEG Optimizer dialog box in Preferences: General. |
2 |
The MPEG Optimizer dialog box appears.
|
3 |
Choose from the following options:
|
• |
Optimal project settings profile - Lets the program to determine
the optimal project settings for your output.
|
• |
Customized converted result file size - Lets you enter your desired
file size output. Video and Audio Settings automatically adjust to
your specified file size.
|
4 |
Click Accept.
|
Create sound file
Sometimes, you want to save the audio track of your video project in a separate audio file. This is especially useful when you want to use the same sound with another set of images, or when you want to convert the audio of a captured live performance into sound files. Corel VideoStudio Pro makes it easy for you to create an audio file of your project in MP4, OGG, WAV or WMA format.
| To create an audio file |
1 |
Open your project and click the Share Step.
|
You can also create a sound file from an existing video file by selecting it in the Library. |
2 |
Click |
3 |
From the Save as type list, select the audio format you want to use
and select Options to display the Audio Save Options dialog box.
|
4 |
Fine tune your audio attributes and click OK.
|
5 |
Enter a file name and click Save.
|
Create disc
Creating video disc is a popular way to share your movie. Click ![]() Create Disc in the Share Options Panel to launch Corel DVD Factory Pro 2010 where you can burn movie project or video to create your own DVD or Blu-ray Disc.
Create Disc in the Share Options Panel to launch Corel DVD Factory Pro 2010 where you can burn movie project or video to create your own DVD or Blu-ray Disc.
You may also launch Corel DVD Factory Pro 2010 by choosing
Burn in the Corel VideoStudio Pro Launcher.
|
Export to mobile device
A video file can be exported to other external devices such as iPod, iPhone, Sony PSP, mobile phones, and Windows-based mobile devices such as smartphones and Pocket PCs. You can only export your project after you have created a video file.
| To export to a mobile device |
1 |
Select a video clip from the Library.
|
2 |
Click |
3 |
In the Save dialog box, type the file name and click the device where
to export your movie.
|
4 |
Click OK.
|
Exporting your movie
Corel VideoStudio Pro provides you with a number of ways to export and share a video file. A video file can be exported to a Web page, sent by e-mail, or set as a desktop screen saver.
Select a video file in the Library. Go to File, select Export then choose the type of output for your video from the pop-up menu.
Output video file to a different format
After you create a final video file of your project or you select a video file that is in the Library. Go to File and select Export. Select the output format you want for your movie from the Export pop-up menu. You cannot export project files hence, you need to convert .vsp files to an acceptable format.
Setting your video as your Movie Screen Saver
Personalize your desktop computer by creating your own video file then setting it as your screen saver.
| To set a video as your desktop screen saver |
1 |
Select a .wmv file from the Library.
|
WMV files are played by the built-in player in Windows. |
2 |
Go to File: Export and select Movie Screen Saver. The Display
Properties dialog box will appear with the video file as the selected
screen saver.
|
3 |
Click OK to apply the settings.
|
Project Playback
Project Playback is used to output your entire project or part of it to a DV camcorder. This also gives you an actual size preview of your movie using the entire screen of either a PC or TV monitor. You can only output your project on a DV camcorder if your project is using a DV AVI template. How your video is played back will depend on the Playback method option that you selected in Preferences.
| To play back your project in actual size |
1 |
In the Share Options Panel, click |
2 |
In the Project Playback - Options dialog box, select Entire project or
Preview range, then click Finish to start viewing the project in full
screen.
|
3 |
To stop the play back, press [Esc].
|
If you only want to output the preview range of your project, select Preview range. |
Record to a DV camcorder
After editing your project and creating a video file, Corel VideoStudio Pro allows you to record the video to your DV camcorder. You can only record a video that is using DV AVI format to your DV camcorder.
| To record a movie to your DV camcorder |
1 |
Turn your camcorder ON and set it to Play mode (or VTR / VCR
mode). See your camcorder's manual for specific instructions.
|
2 |
Click the Share Step.
|
3 |
Select a compatible DV AVI file from the Library.
|
4 |
Click |
5 |
The DV Recording - Preview Window dialog box opens. You can
preview the video file here. After you are done previewing, click Next.
|
6 |
In the Project Playback - Record Window dialog box, use the
Navigation Panel to go to the section of the DV tape where to start
recording.
|
Click Transmit to device unit for preview to preview your project on the DV camcorder’s LCD monitor. |
7 |
Click Record. After you are done recording your project to the DV
camcorder, click Finish.
|
Before recording a video file back to your DV camcorder, make sure the video is saved with the correct codec. For example, the codec DV Video Encoder usually works well for most NTSC DV camcorders. You can select it from the Compression tab in the Video Save Options dialog box. |
Record to an HDV camcorder
To record your finished project to an HDV/HD camcorder, you must first render it as HDV/HD-encoded MPEG-2 transport stream file.
| To record a movie to your HDV camcorder |
1 |
Turn your camcorder ON and set it to Play/Edit mode. See your
camcorder's manual for specific instructions.
|
2 |
In Share Step Options Panel, click |
3 |
Enter a file name in Create Video File dialog box.
|
4 |
Corel VideoStudio Pro renders the project. When done, HDV
Recording - Preview Window dialog box opens. You can preview the
video file here.
|
5 |
Click Next to start recording.
|
6 |
In the Project Playback - Record Window dialog box, use the
Navigation Panel to go to the section of the DV tape where to start
recording.
|
Click Transmit to device unit for preview to preview your project on the HDV camcorder’s LCD monitor. |
7 |
Click Record. After recording your project to the HDV camcorder,
click Finish.
|
Share videos online
Share your video projects online by uploading your videos to YouTube and Vimeo. You can access these sites from within Corel VideoStudio Pro.
| To upload your video to YouTube |
1 |
Select a video file or clip from the Library.
|
2 |
In the Share step, click |
3 |
Select a video file or clip from the directory folder and click Open.
This will launch the Log-in YouTube window.
|
4 |
If you already have an account, enter username and password.
|
If you do not have an existing YouTube account, click Join YouTube to establish an account and follow the on-screen instructions. |
5 |
Click Next. The Copyright Disclaimer page will appear. Check the
agreement statement and click Next. The metadata dialog box will
appear. Fill in the necessary information about the video and click
Next. This shows the video file properties.
|
6 |
Click Upload Video. The Upload Video Progress bar shows the
progress of your upload.
|
7 |
Click OK when video has been successfully uploaded. This launches
the YouTube web page where you can check out the recently
uploaded video file.
|
You can also upload videos to YouTube from Corel VideoStudio Express 2010. |
| To upload your video to Vimeo |
1 |
Select a video file or clip from the Library.
|
2 |
In the Share step, click |
3 |
If you have already saved your video file, select Browse for a File to
upload to locate the video from the file directory. If you have not
saved your video, select from the list of video qualities. Your video
will be saved following the quality settings you selected.
|
4 |
If you already have an account, enter your email and password.
|
If you do not have an existing Vimeo account, click Join Vimeo to establish an account and follow the on-screen instructions. |
5 |
Click Log in. The authorization appears.
|
6 |
Click Yes, authorize this app! The metadata dialog box appears.
|
7 |
Fill in the necessary information such as your video title, description,
privacy settings and additional tags.
|
8 |
Click Next to upload your video. The Upload Video Progress bar
shows the progress of your upload.
|
9 |
Click Done when uploading is completed. This launches the Vimeo
web page where you can check out the recently uploaded video file.
|