| • | To add matched objects |
| • | To blur parts of tracked objects |
| To add matched objects |
|
| 1 | On the Track Motion window, enable Add matched object. |
| A matched object appears on the Preview Window. |
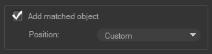
| 2 | Adjust the position of the matched object by doing one of the following: |
| • | Choose an option from the Position drop-list. |
| • | Drag the matched object marker to your preferred position in the Preview Window. |
| 3 | In the Preview Window, drag the corners of the matched object to adjust its size. |
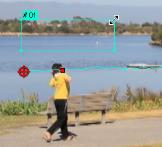
| 4 | Proceed with motion tracking as specified in previous procedures to generate the tracking path. |
| 5 | Click OK. |
| The Track Motion dialog box closes and a placeholder is added to the Overlay track. |
| 6 | Browse for the media clip you want from the Library and drag it over the placeholder on the Timeline. While dragging over the placeholder, press [Ctrl] to snap the new media clip into the placeholder’s location and replace the clip. |
![]()
| To blur parts of tracked objects |
|
| 1 | Click the Apply Mosaic button |
| The prospective blurred area will appear in the Preview Window as a grid. |
| 2 | Adjust the size of the grid to cover parts that you want to blur by dragging the nodes at the corners of the grid. |
| Note: Options for matched object will be grayed-out when you enable this feature. |
![]()
| 3 | Proceed with motion tracking as specified in previous procedures to generate the tracking path. |
| The area of the tracked object will have a mosaic-like effect when you view the video in the Preview Window of the main program. |
![]()
| 4 | Click OK. |
Copyright 2014 Corel Corporation. All rights reserved. Legal Notice